我的图像和数据提供商
注解
一般来说,在 Mapflow 中使用航空或卫星数据有四种方法:
我的图像 – 将您自己的图像上传到 Mapflow 平台并使用它们与 Mapflow 模型进行处理。
影像底图 – 外部 3.1 图像提供者(例如 Mapbox、ArcGIS 等)已在 Mapflow 中启用,可即时使用。您可以将它们与默认模型一起使用。
Custom URL – you can set your own XYZ or TMS layers, including custom data providers like Nearmap, etc. This is available in Mapflow Web, API and QGIS plugin.
图像搜索 – 在 Mapflow Web 和 QGIS 插件中搜索历史商业图像,并下订单以从我们的合作伙伴处获取图像。搜索还会查看您自己上传的图像,请参阅“搜索您自己的图像(我的图像)”部分。
注解
❗️ 您可以在Mapflow Web、Mapflow QGIS 插件 和API 中使用名为 我的图像 的工具。
QGIS 中的“我的影像”
“我的图像”允许您在单独的*图像集合*中收集图像。使用此服务,用户可以轻松管理其数据收集,重用图像以使用 Mapflow 模型进行下一步处理和分析。
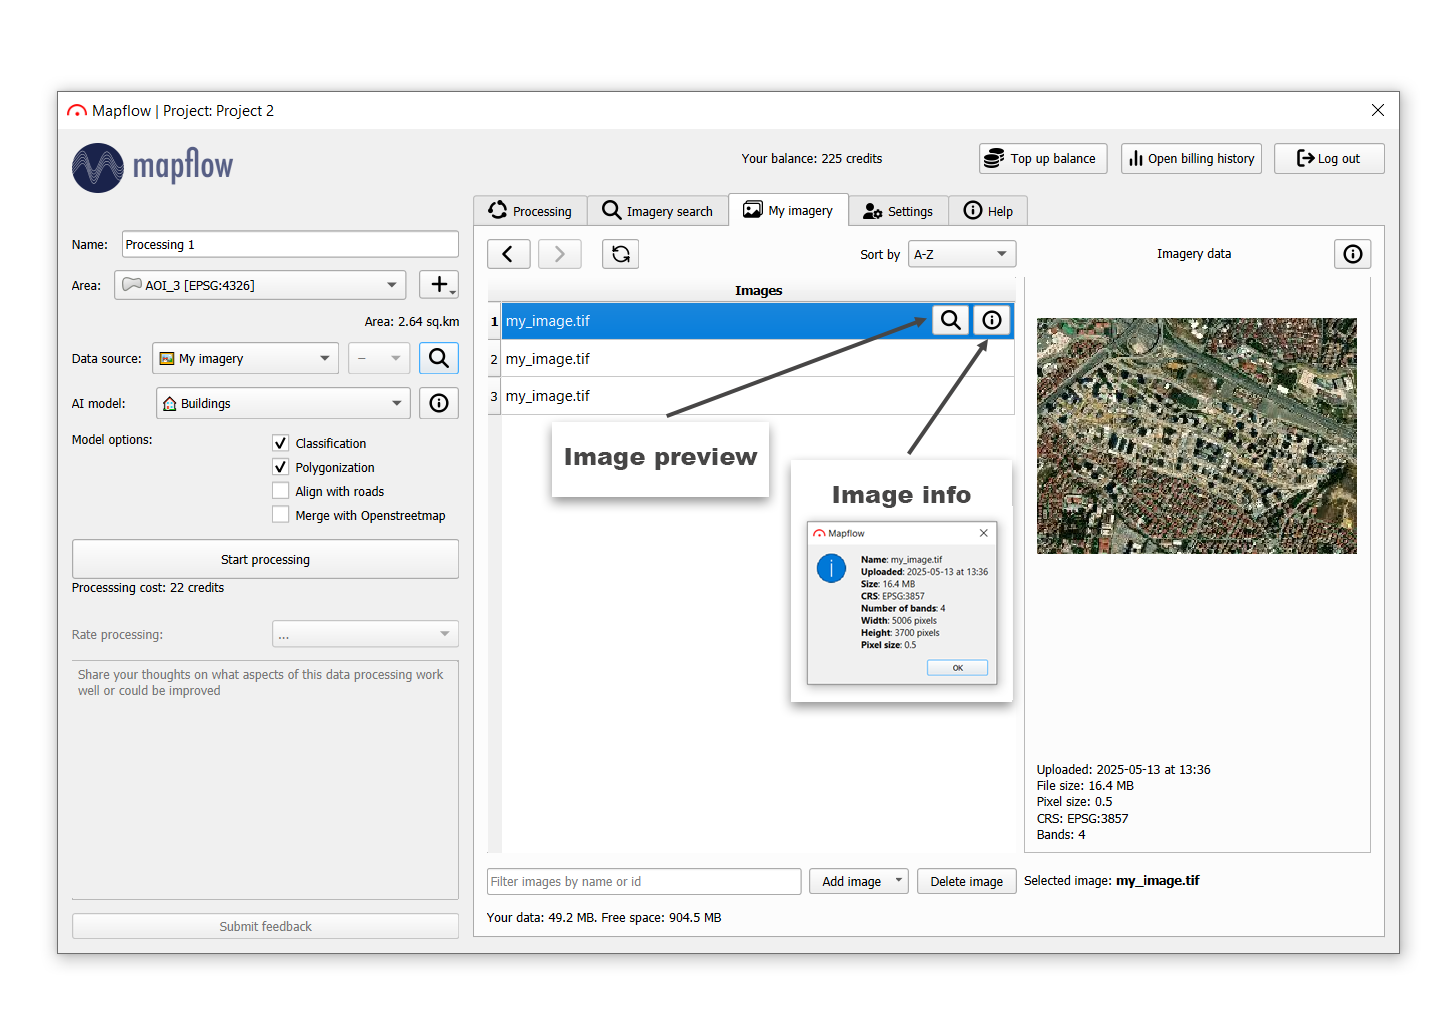
- 基本用法:
一次处理多幅图像。如果您正在经历在一个区域中处理多个图像,那么此工具将会很有帮助。
重用上传的图像进行下一步处理
向图像集合添加标签,使其可在 Mapflow 项目中搜索
- 使用“我的影像”服务的基本场景如下:
您正在创建图像集合(一组图像)
可以选择添加标签来识别集合
将您的图像上传到集合中
使用整个图像集合或特定图像开始使用 Mapflow 进行处理。使用这两种方法,您都可以通过应用 AOI 来限制处理区域。
重要
主要图像上传限制和限制列于平台使用要求。
注解
请参阅Mapflow QGIS 插件 详细了解如何使用它。
"My imagery" in Mapflow Web
The My Imagery page in Mapflow Web lets you manage your imagery collections (mosaics): create new collections, upload your own GeoTIFFs, preview them, monitor storage, and start a processing directly from an uploaded image. Open the page from the main menu of the Web app (see the interface overview in Mapflow - 开始).
马赛克是为处理和预览而组织的地理参考图像的集合。当您处理覆盖一个区域的多个航拍图像时,马赛克非常有用。
典型工作流程
The basic scenario of working with "My imagery" in Mapflow Web:
上传您的图像 – 将 GeoTIFF 文件拖到上传区域(或单击浏览)。如果表中未选择马赛克,则会自动创建新马赛克并将文件上传到其中。要上传到现有马赛克,请先在列表中选择它。您还可以使用“+创建马赛克”提前创建一个空马赛克。
等到图像准备好 – 每个图像都会获得一个状态:上传和预处理时*正在进行*,可以使用时*就绪*,如果出现问题则*失败*。
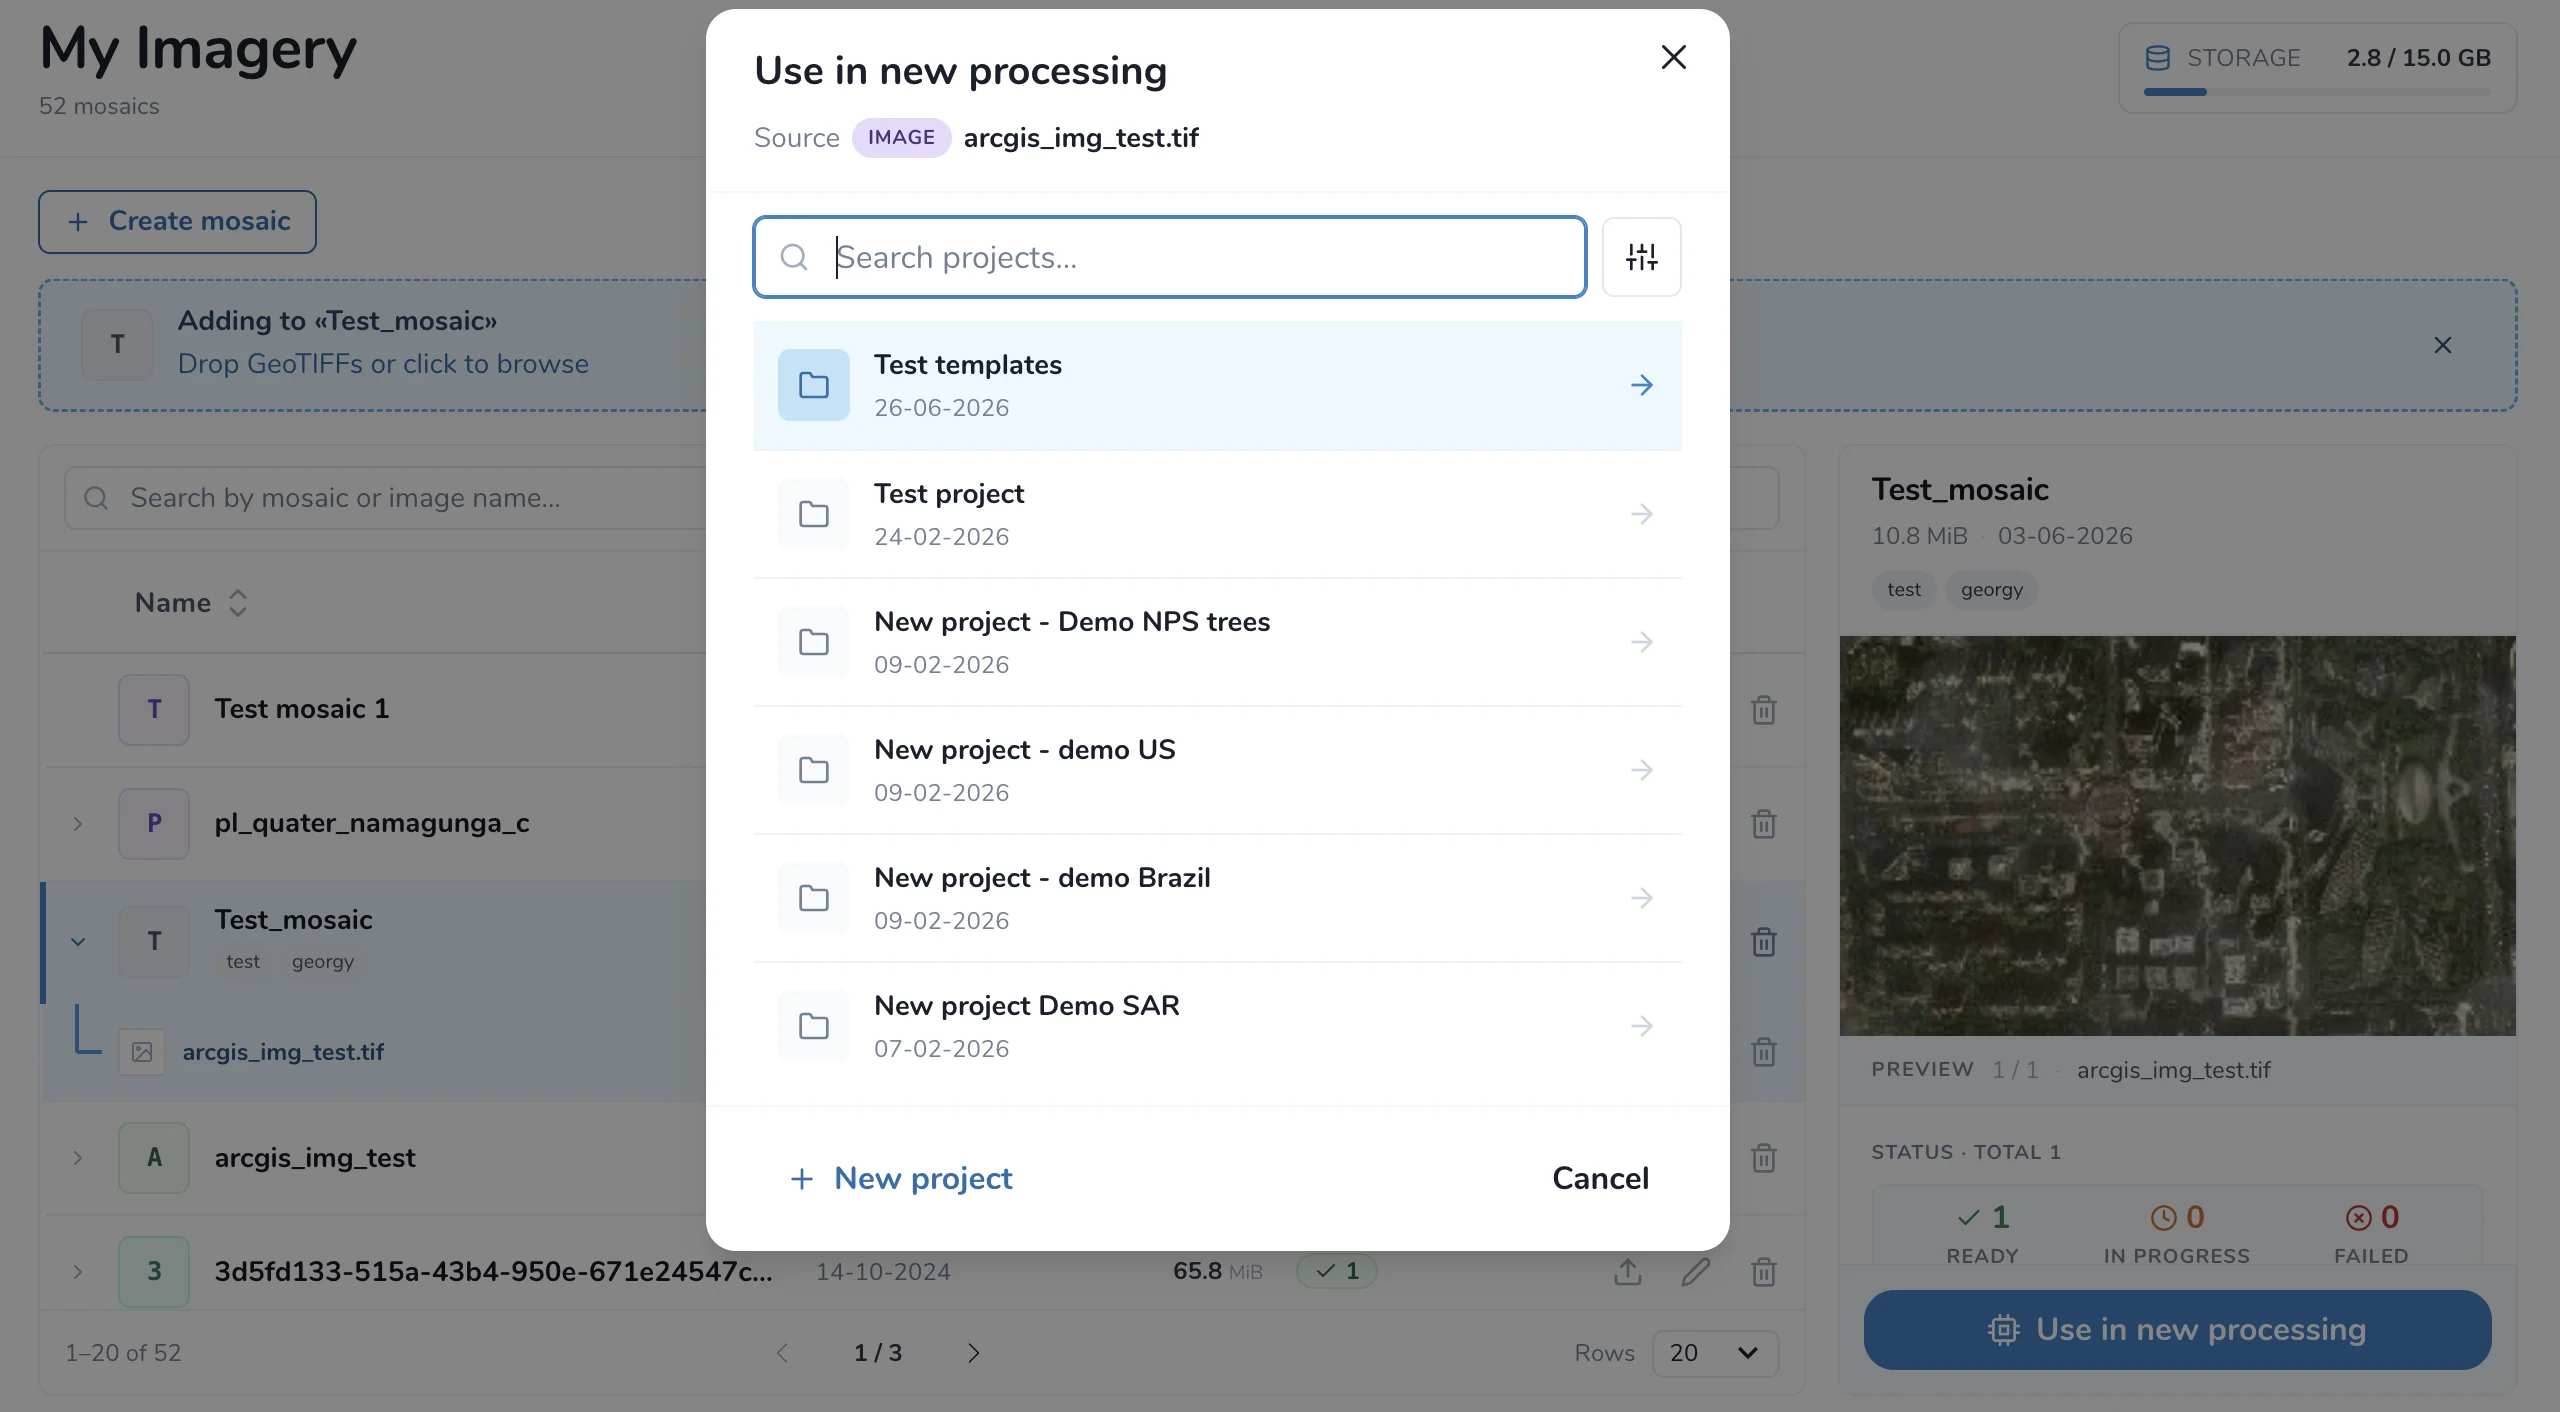
Start a processing – click "Use in new processing" button on the selected mosaic (or image), then pick an existing project or create a new one with "+ New project".
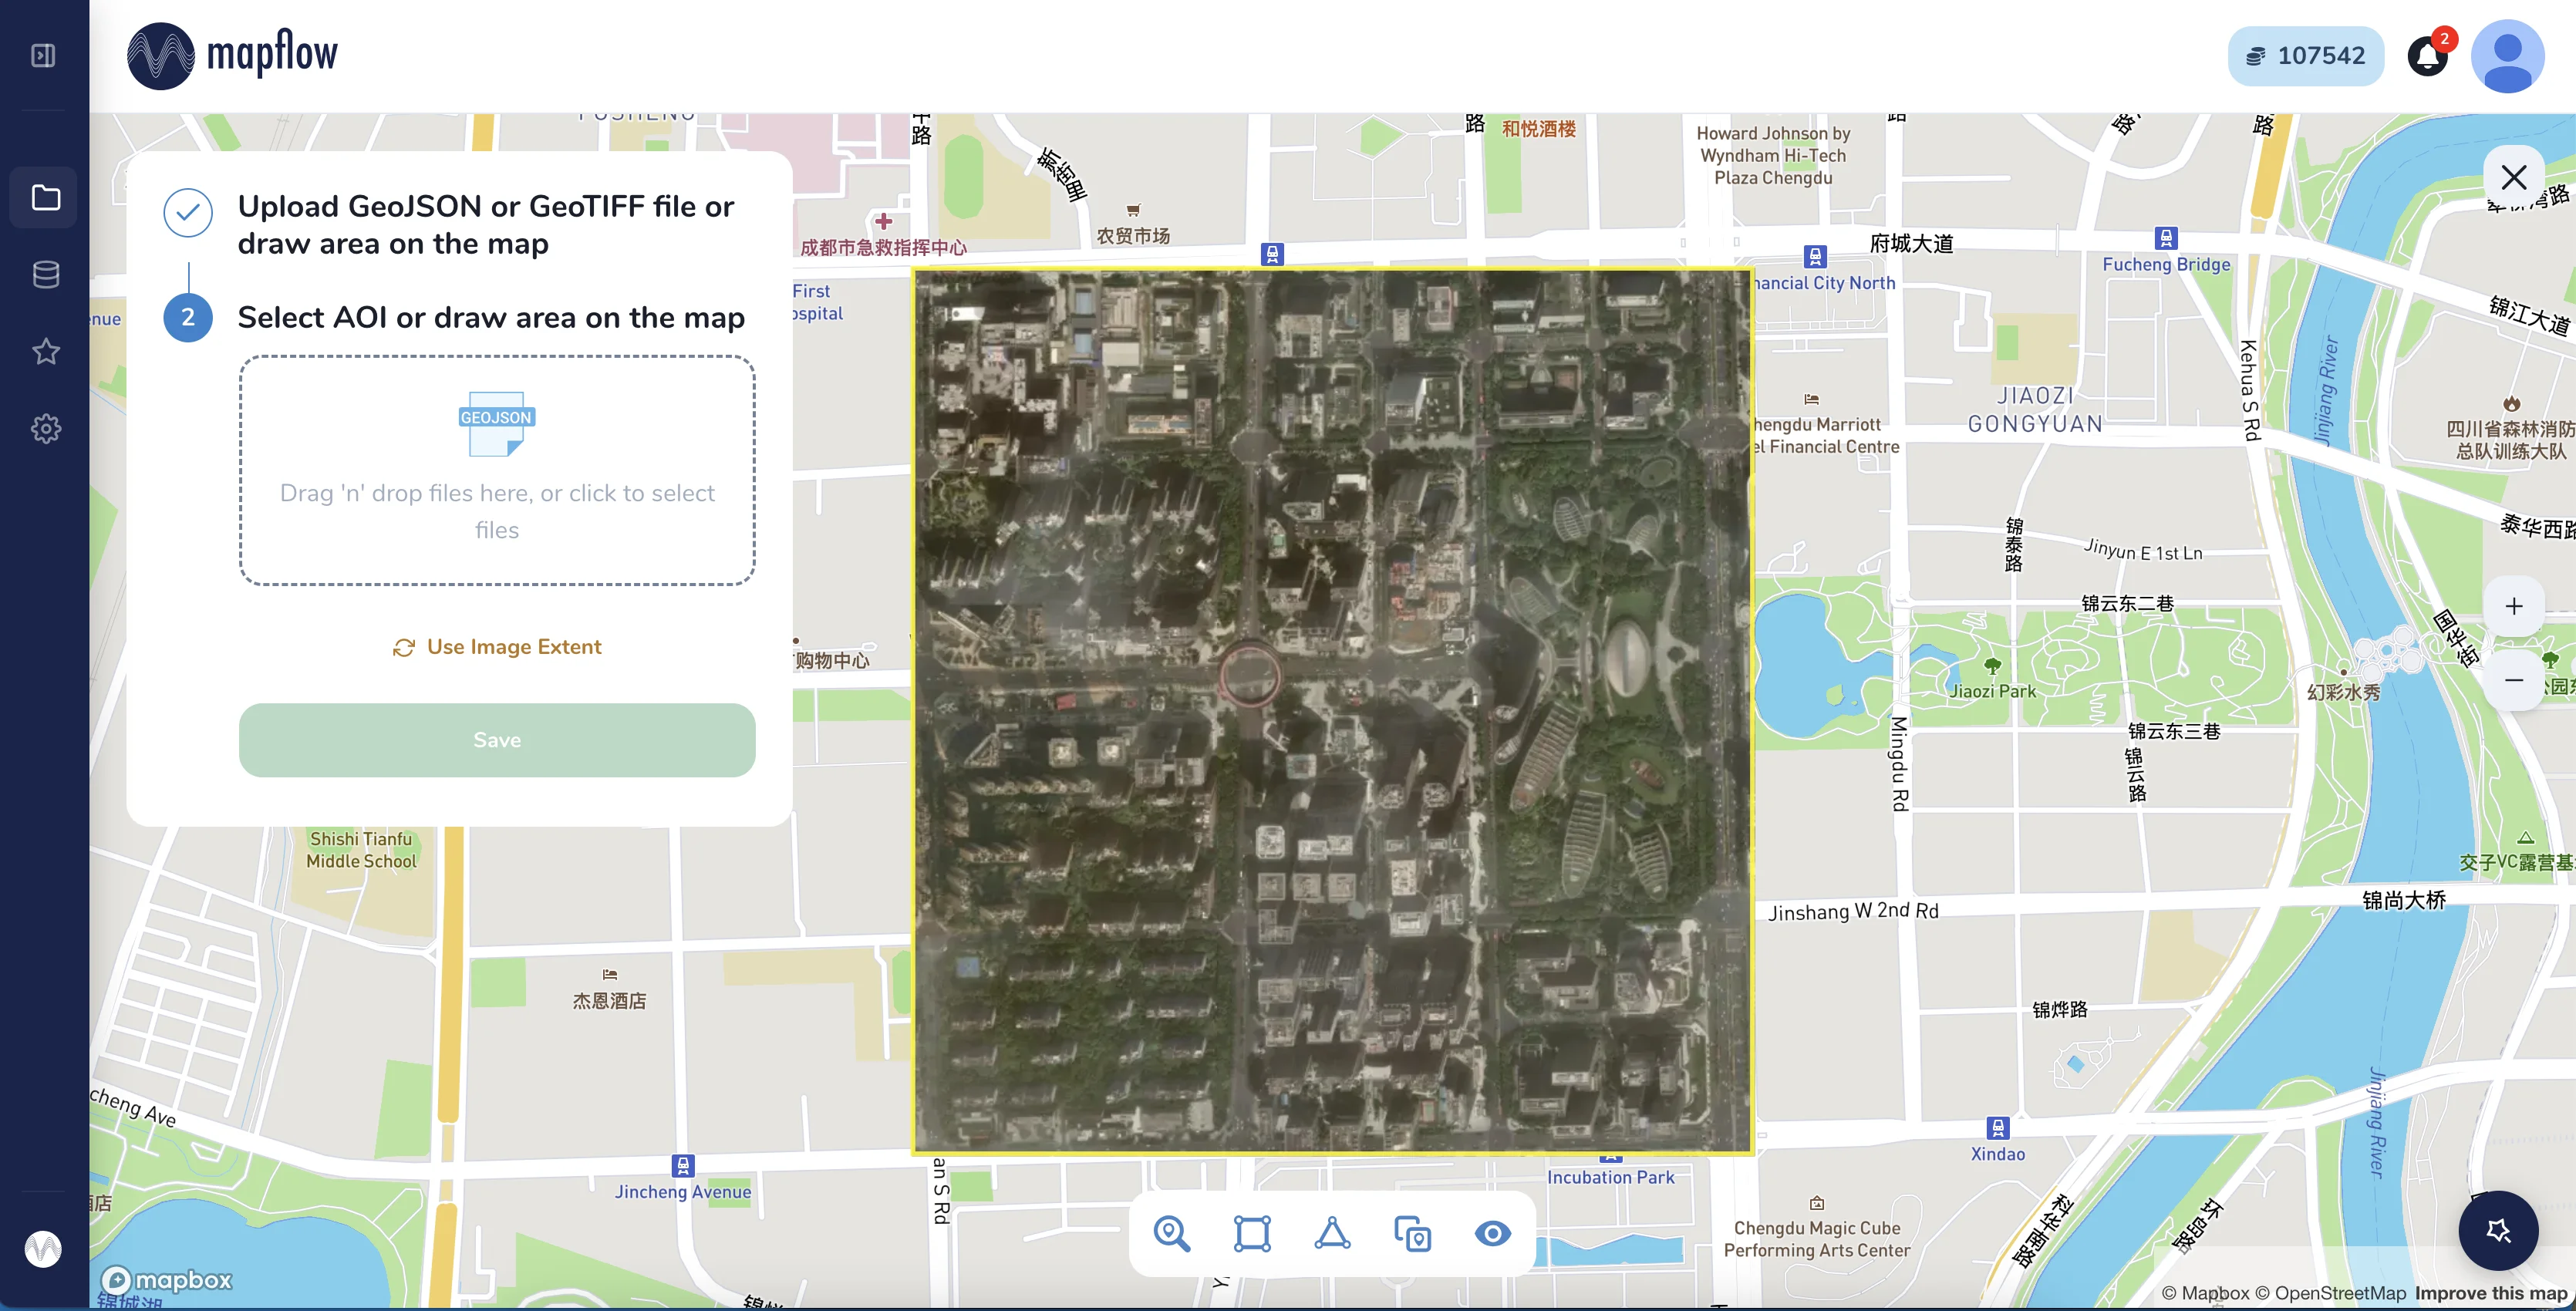
设置处理区域 – 点击“使用图像范围”来处理整个图像。您还可以在地图上绘制 AOI,或上传 GeoJSON 文件来处理图像的特定部分。
点击“保存”按钮继续处理设置:选择AI模型,配置其参数,然后运行处理!
我的影像主页
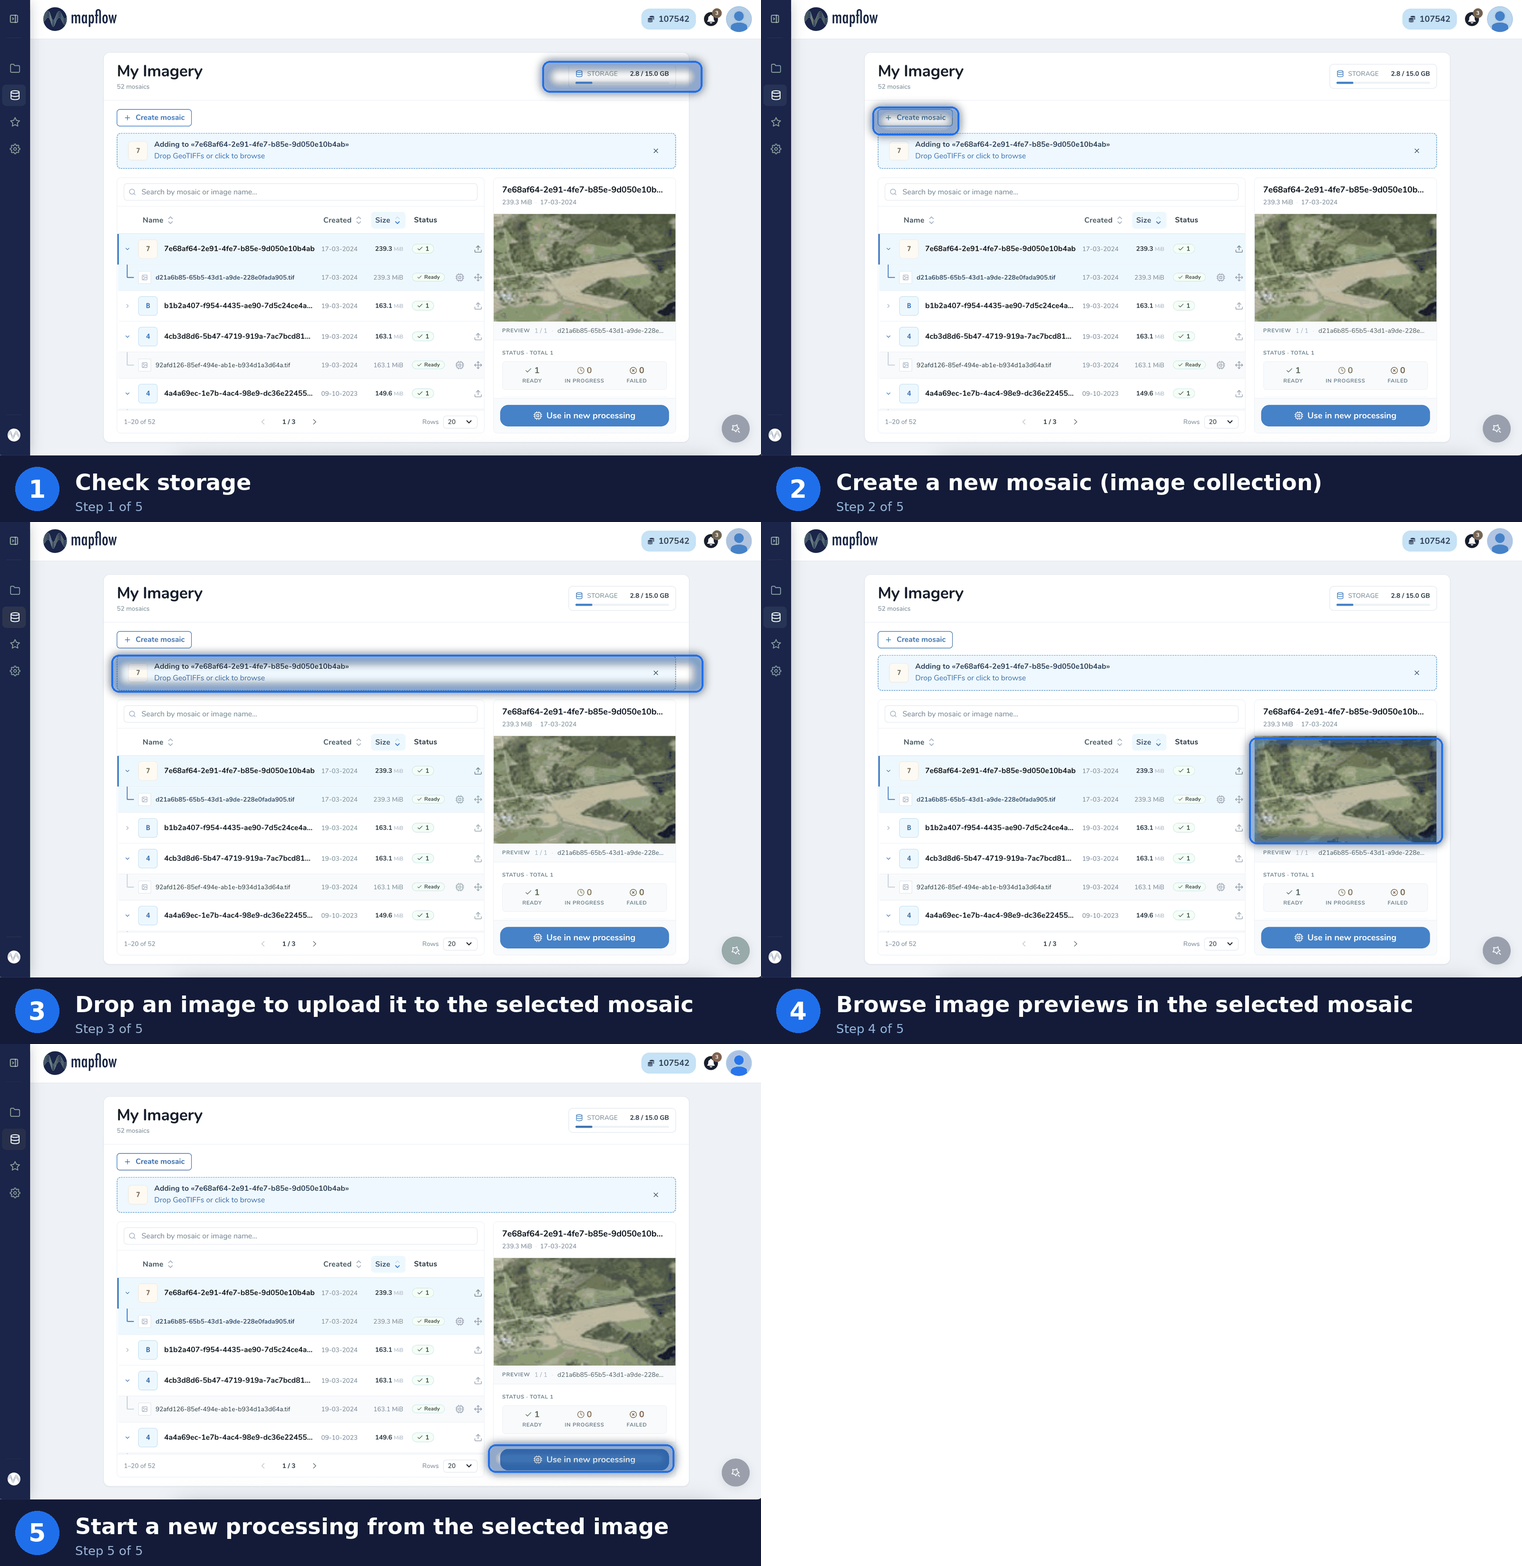
该页面由以下元素组成:
存储空间 – 检查已使用的存储空间量(已使用/总计)。当限制用完时,您可以通过删除未使用的数据来释放空间,或者通过切换到高级计划之一来延长限制。
创建马赛克 – 创建新的马赛克(图像集合)以将相关图像分组在一起。
上传区域 – 放置 GeoTIFF(或单击浏览)将其上传到选定的马赛克中。
注解
请参阅使用平台的要求了解支持的格式和限制。
图像预览 – 浏览马赛克表,并针对所选马赛克预览其图像及其状态(就绪、进行中、失败)。
用于新处理 – 从所选图像开始新处理。
注解
每个马赛克和图像都有自己的状态。该表列出了所有马赛克,每个马赛克都有唯一的 UUID,可以按名称搜索,并按名称、创建日期、大小和状态排序。
用于新加工
选择 在新处理中使用 将打开一个对话框,您可以在其中选择要在其中开始处理的项目。从列表中选择一个现有项目,或使用 + 新项目 创建一个新项目。
预览和 AOI
您可以在地图上预览影像并设置处理区域:上传 GeoJSON/GeoTIFF、在地图上绘制区域,或单击 使用影像范围 以使用影像边界。有关绘制和上传 AOI 的详细信息,请参阅 2.1.选择兴趣区。
🔍 图像搜索和排序
“图像搜索”允许 Mapflow 用户搜索其分析区域内的可用卫星图像。它由 Mapflow API 提供支持,通过我们的合作伙伴集成提供对全球卫星数据提供商的访问。
- 可用于搜索和(新!)订购的图像提供商:
历史图像(汇总并提供来自领先卫星运营商的卫星图像)
- 支持基于帐户的集成和搜索的图像提供商:
ArcGIS 世界影像
参见
阅读有关如何在 Mapflow 中使用 3.1 图像提供者 的更多信息。
重要
❗️ 您需要订阅Mapflow Premium才能订购商业数据提供商并运行分析。
Using Imagery Search in Mapflow WEB
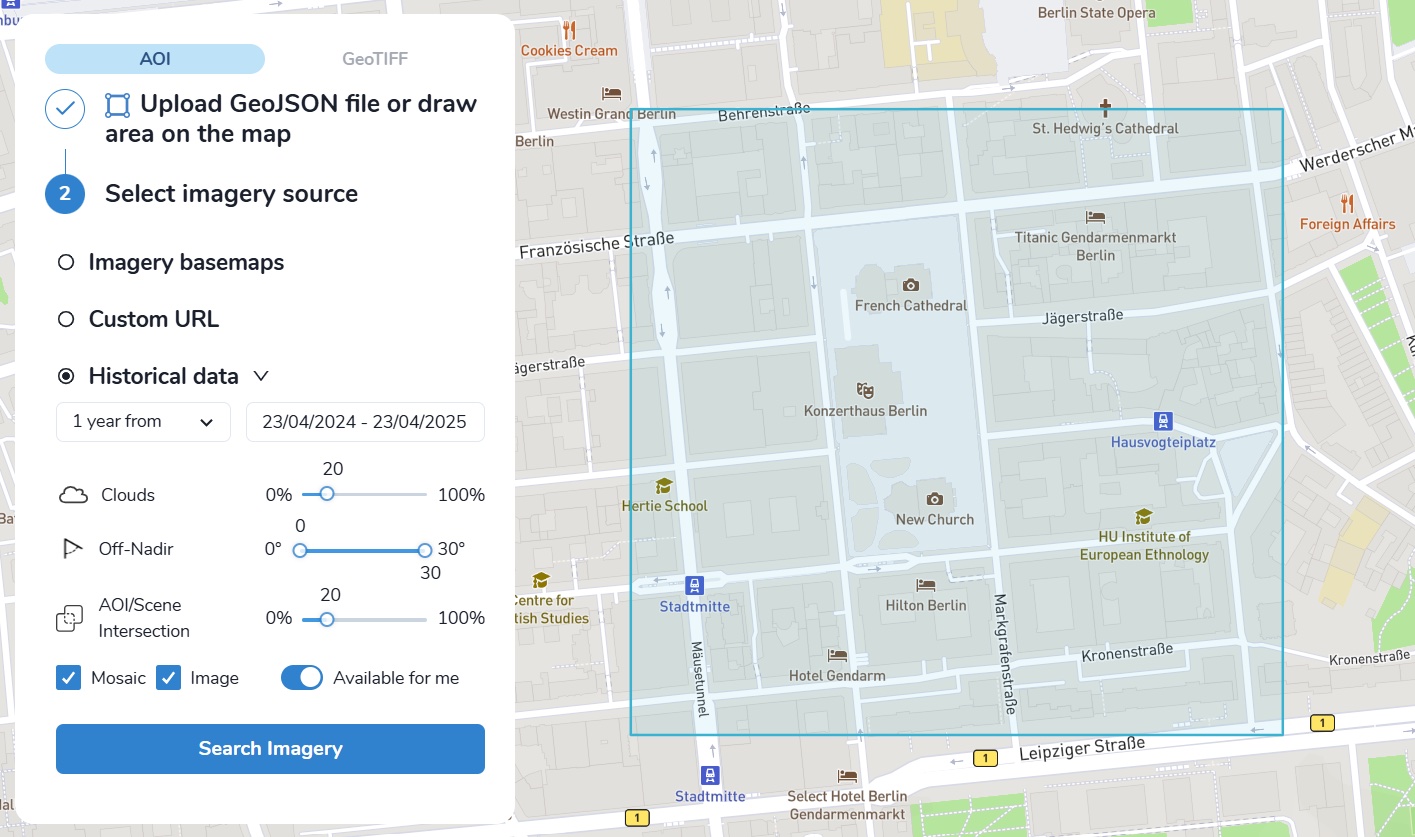
要使用图像搜索数据开始处理,您必须:
选择日期范围或特定日期;
设置搜索参数(云、离最低点、AOI/场景交叉点);
应用提供商过滤器:
“马赛克”
“图像”
“对我可用”- 搜索结果将仅显示与您的帐户相关联的提供商。
图像提供商类型:
马赛克 - 图像底图(例如 ArcGIS 或全局马赛克)允许按日期和 AOI/场景交集搜索图像。
图像 - 卫星图像档案允许按多种标准搜索历史图像,包括云、离最低点和分辨率。
👉 对我可用 - 按连接到您帐户的提供商过滤结果,以使用 Mapflow 运行分析。
单击“搜索图像”后,将出现一个包含搜索结果和图像足迹的表格:
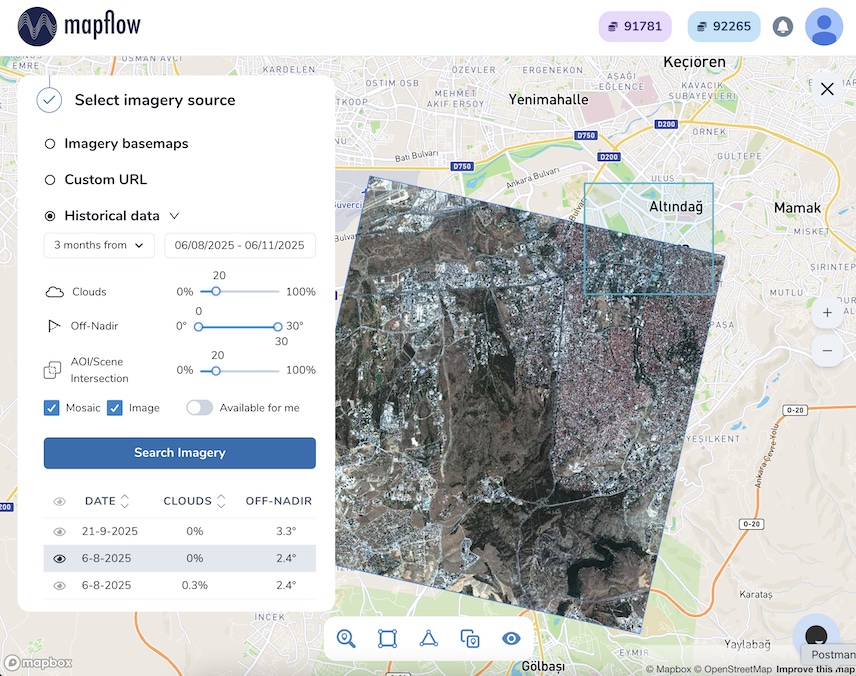
您可以对地图上的图像进行排序、启用或禁用,如果提供商支持此功能,还可以预览它们(在表格中选择图像后,预览将自动显示在地图上);
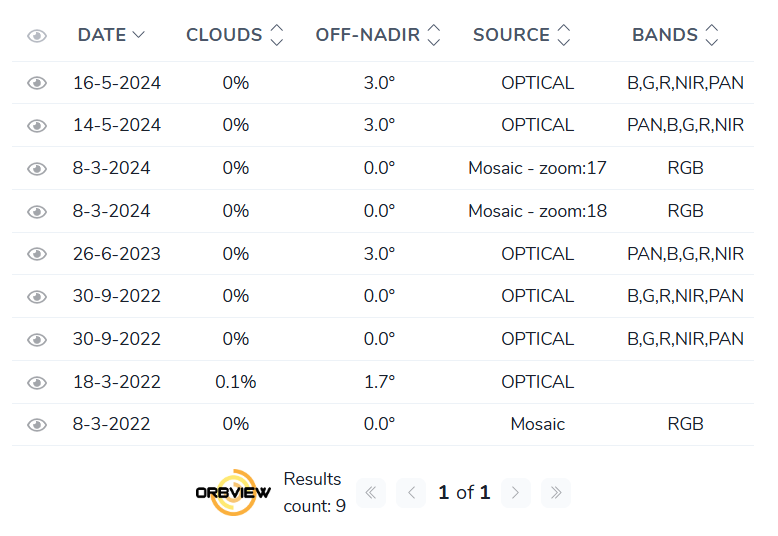
在最后一步,您需要通过在表中单击所需的图像来选择它,然后单击“保存”。现在您可以开始处理了!
警告
👆️️️️️️ 您只能使用可用的提供商(“对我可用”)开始处理。如果您尝试使用未连接到您的帐户的提供商提供的图像,您将看到相应的警告“该提供商不适用于您的帐户,您需要更改计划”。您需要订阅 Mapflow Premium 才能订购商业数据提供商。
新的!搜索您自己的图像(我的图像)
除了全球卫星数据提供商之外,图像搜索还会查看您自己的图像:您上传到我的图像 的图像和马赛克。您无需在任何地方进行切换 - 每次您单击“搜索图像”时,系统都会自动搜索您自己的数据以及外部提供商。
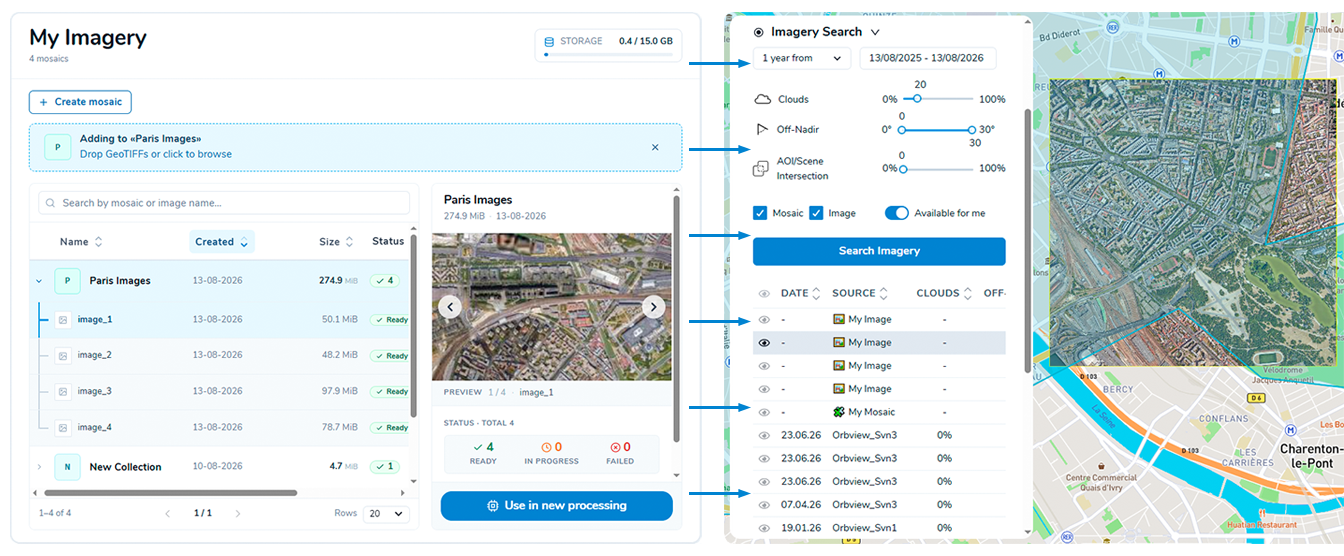
Your imagery → right in the search results!
使用方法:
绘制或上传覆盖您影像的 AOI(参见 2.1.选择兴趣区)。
Set the search parameters as usual and click Search Imagery.
在结果表中,您自己的数据标记在 Source 列中:
🖼️ 我的图片 - 上传到马赛克的单张图片;
🧩 My Mosaic - a whole mosaic (collection of images).
注解
您上传的图像通常没有采集元数据(日期、云量、偏离最低点的角度、分辨率)。此类单元格在表中显示为“-”,并且 云 / 离最低点 / AOI/场景交叉 过滤器不会隐藏您自己的图像,即使您收紧它们也是如此。
注解
仅可搜索状态为“就绪”的图像。仍在上传(进行中)或失败的图像不会显示在搜索结果中。
您可以选择“我的图像”/“我的马赛克”结果,在地图上预览它并开始处理,就像处理任何其他搜索结果一样:
单击结果表中的行以选择图像。
单击 保存 并继续进行处理设置 - 所选图像将用作处理源。
Planned Search in Mapflow WEB
如果您对当前的搜索结果不满意,或者您希望获得新的图像更新而无需手动重复搜索,则此服务可以完成这项工作。
How to create a planned search
从 GeoJSON 文件中绘制或上传感兴趣的区域,选择表中的全部或仅必要的区域。如果您的 GeoJSON 要素包含属性“名称”,则 AOI 名称将自动加载到表中。您还可以在编辑模式下手动指定 aoi 名称(AOI 菜单中的“编辑”按钮)。
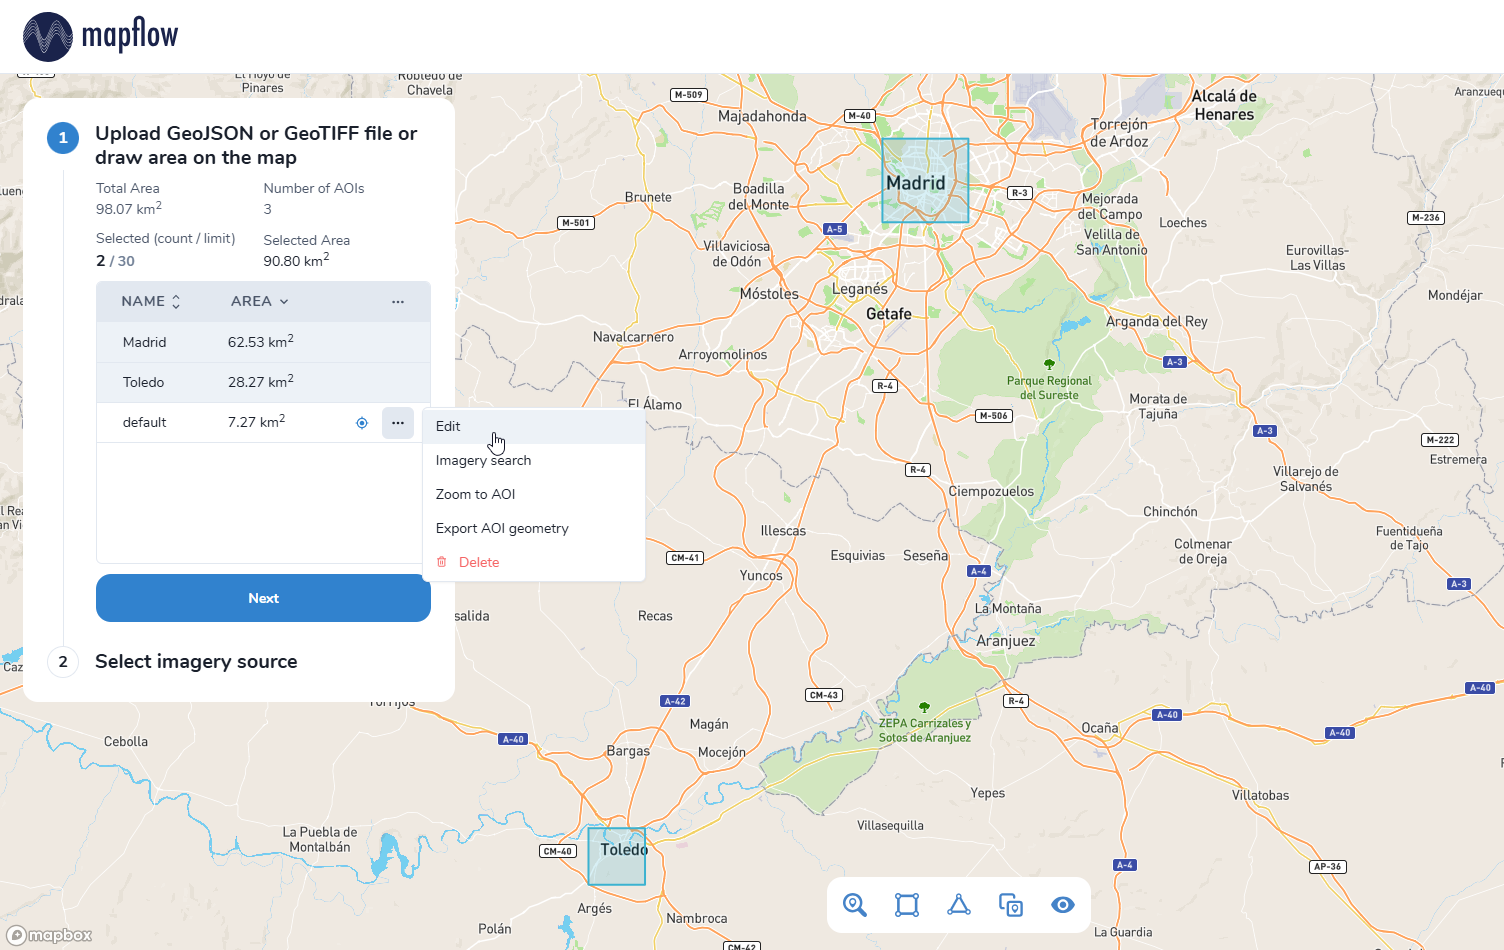
小技巧
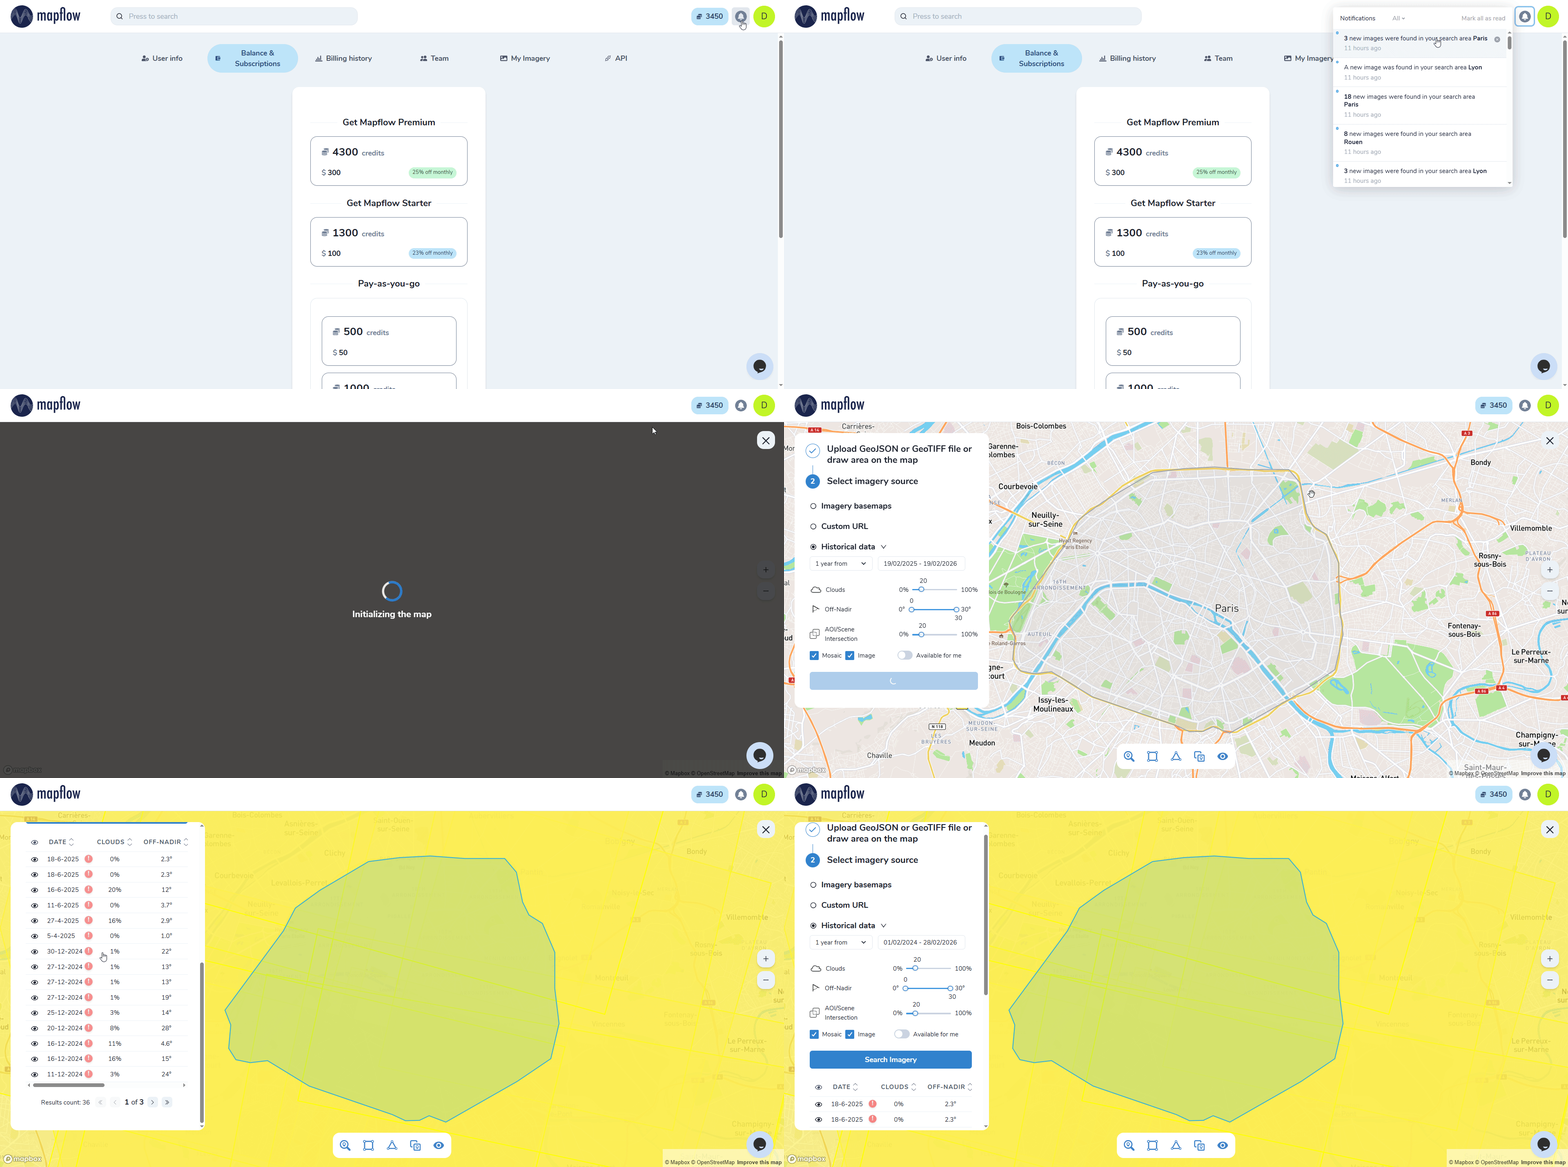
您分配的 AOI 名称将出现在有关为此区域找到的新图像的通知中。要直接转到该区域的结果,只需单击应用程序中的通知或电子邮件中的“查看搜索结果”按钮即可。
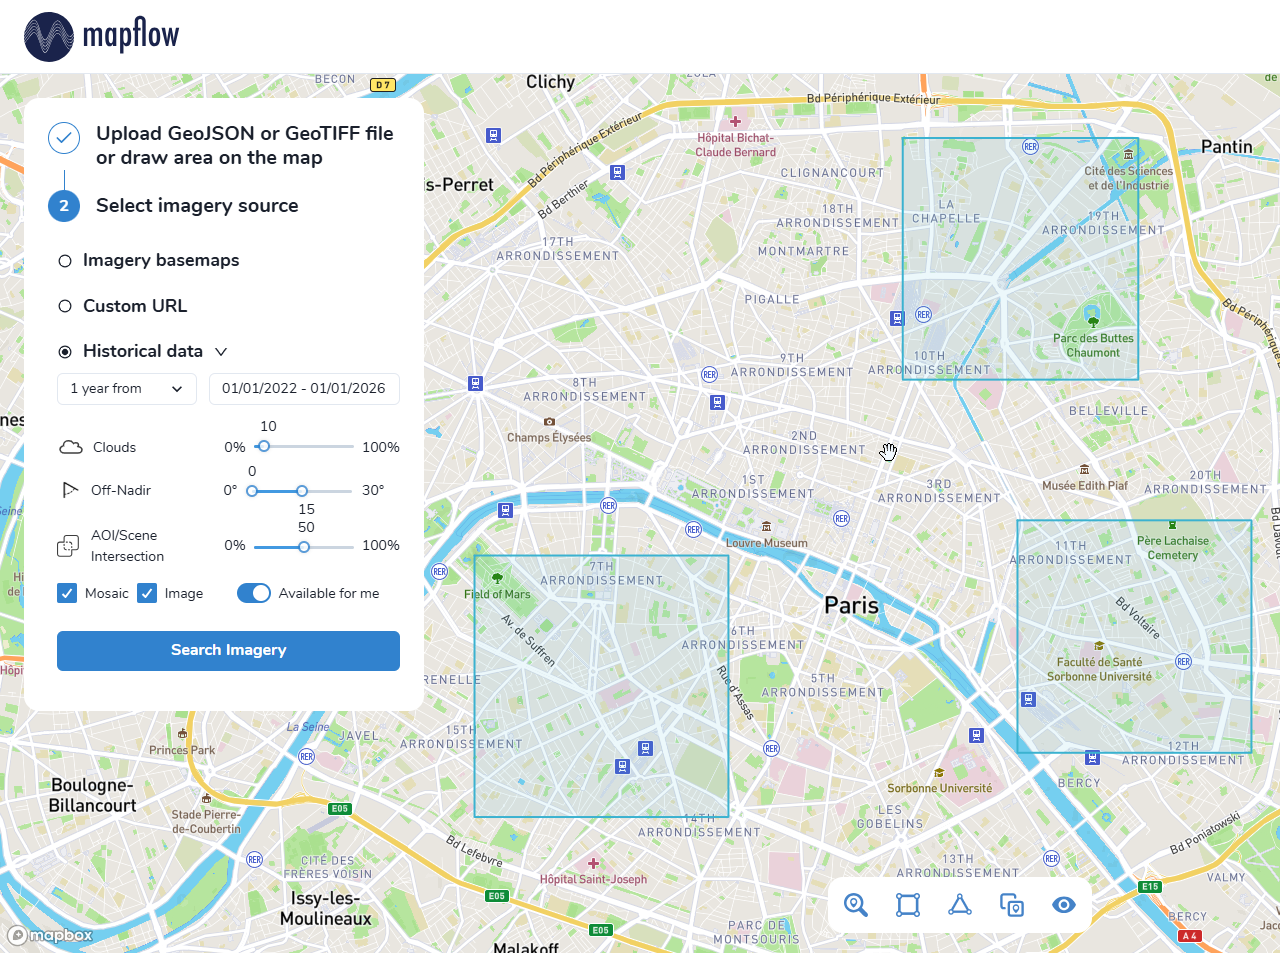
设置所需的搜索条件并单击“搜索图像”
注解
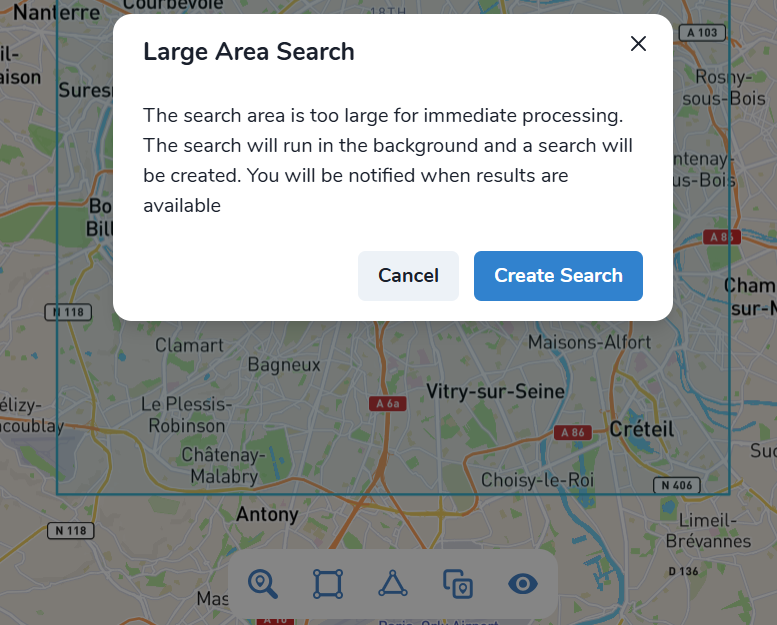
如果您的搜索区域总面积超过 700 平方公里,当您单击“搜索图像”而不是立即搜索时,系统会提示您创建推迟的后台搜索。
之后,将出现搜索结果,并且“另存为计划”按钮将可用
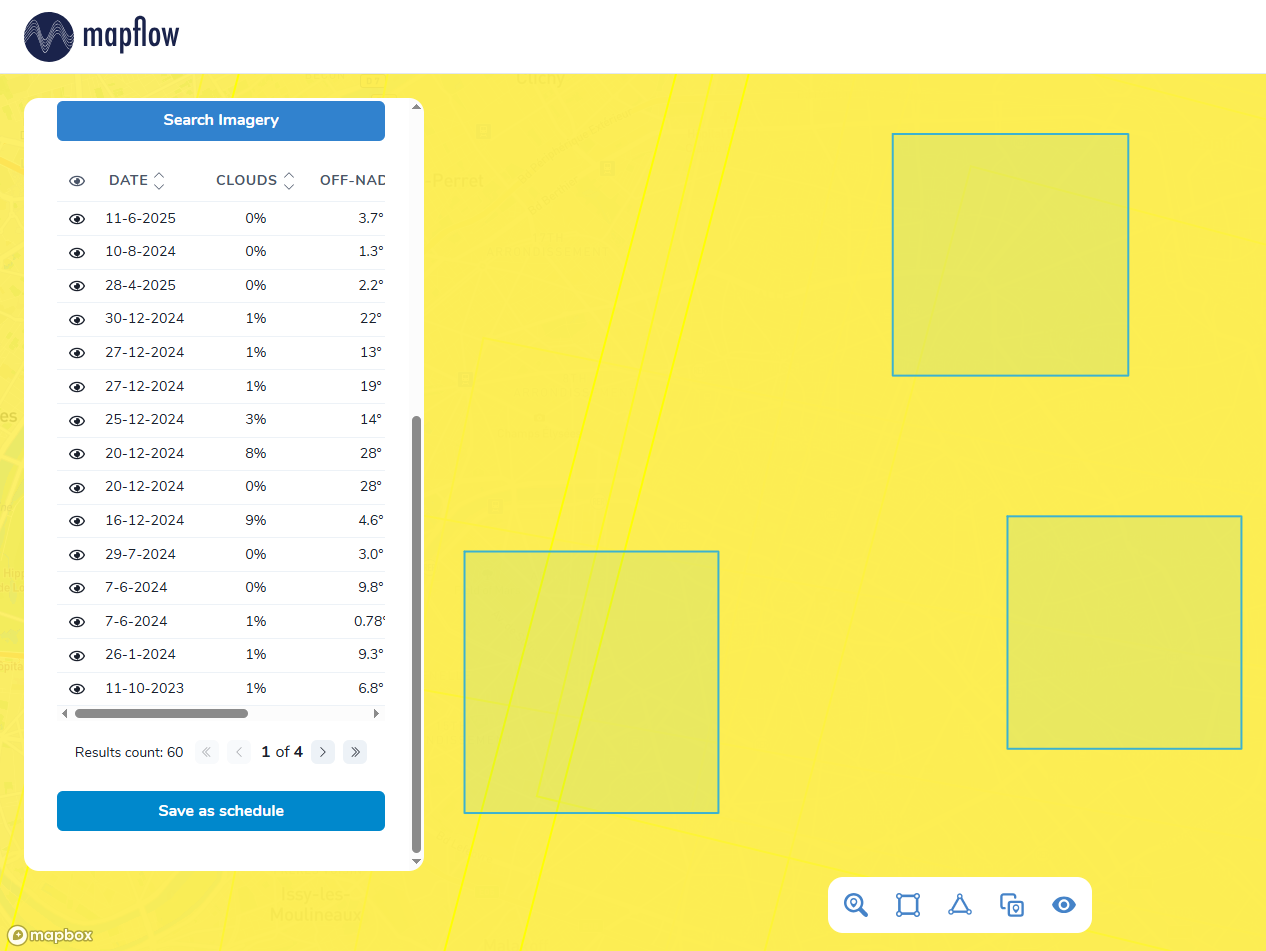
当您点击它时,系统将提示您选择此搜索计划的名称
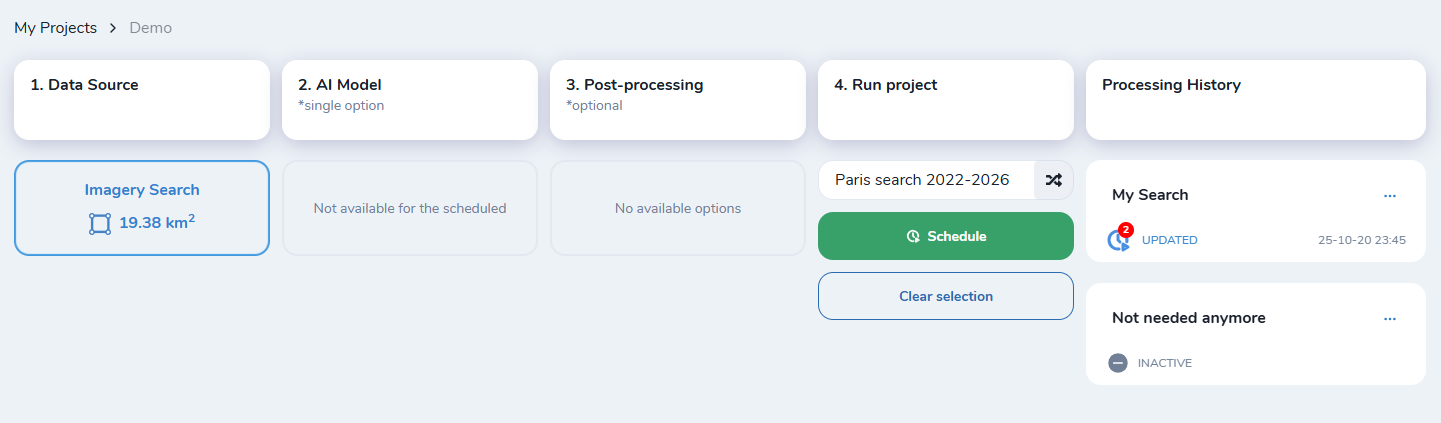
创建后,搜索将在一段时间后完成,您可以使用“在地图上查看”按钮查看搜索结果
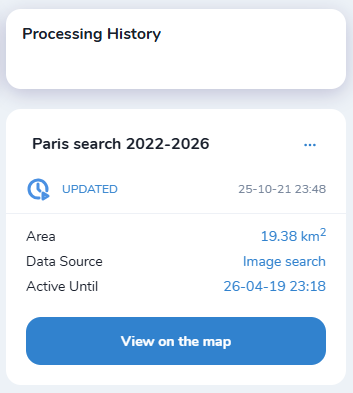
查看后台搜索结果
现在,Mapflow 中将启动后台搜索,新图像到达时您将收到通知。
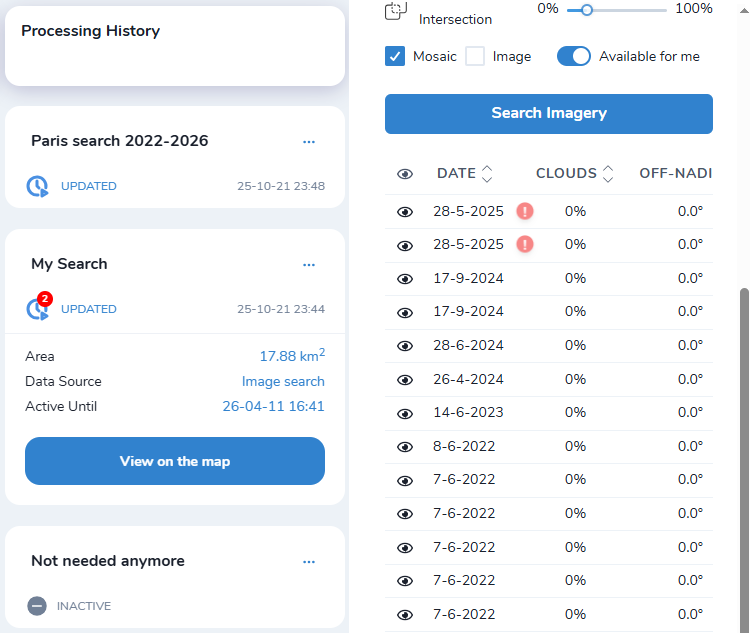
搜索卡显示标签  找到的新图像。单击结果表中的图像将删除标签。
注解
查看结果的两个关键点:
打开搜索时,您将看到给定区域找到的所有结果
如果您的搜索由多个 AOI 组成,并且您对特定的 AOI 感兴趣,则可以在“上传 GeoJSON 或 GeoTIFF 文件...”部分中选择它们 → 现在,将仅显示所选 AOI 的结果。另外,您可以通过单击地图来选择/取消选择 AOI,结果表将自动更新。
Processings <> Planned Search
处理的启动方式与 即时搜索 相同:
Open a planned search
选择所需的图像并单击“保存”
选择必要的参数并开始加工!
从搜索启动的所有处理都与其链接。您可以在搜索的 AOI 表中找到它们。只需在地图上选择需要的,它们就会全部显示在一张地图上。
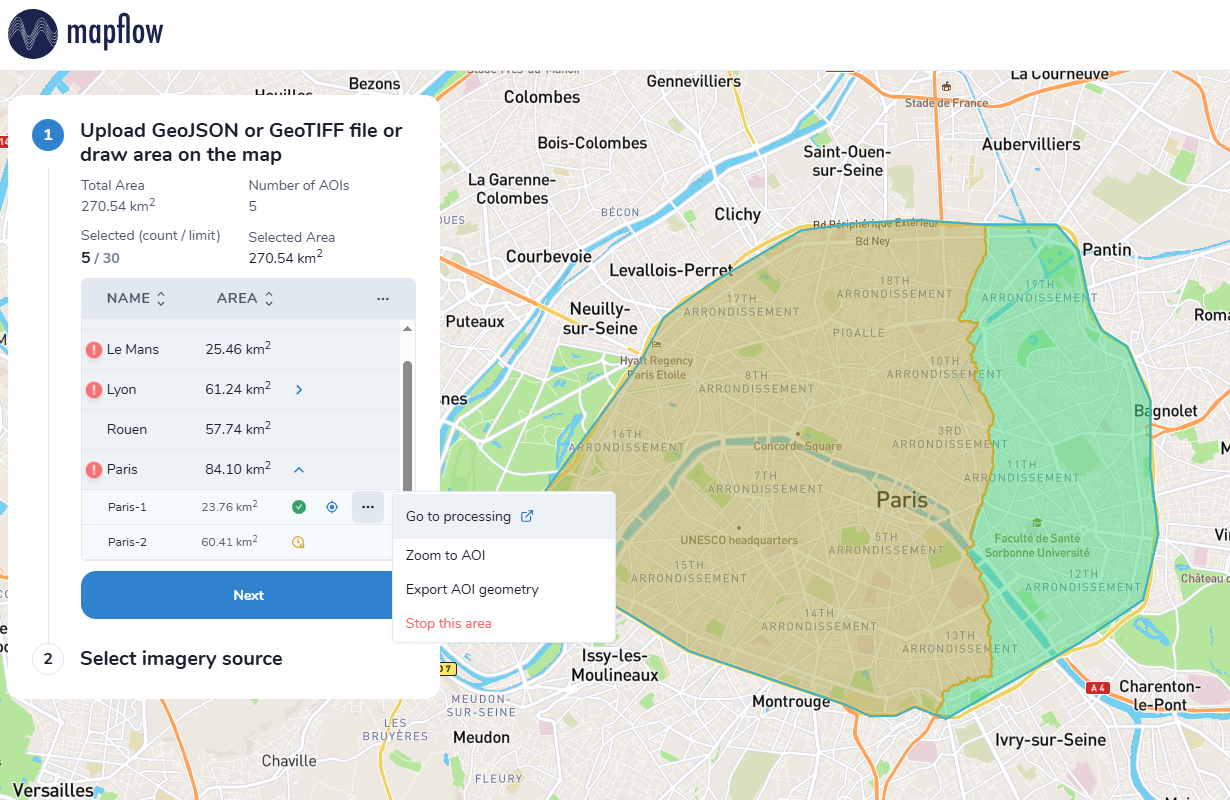
您可以通过搜索 AOI 表中的处理来执行一些操作:
在新选项卡中打开此处理
下载处理边界
将搜索 AOI 剪辑到其处理的边界(“停止此区域”按钮)
如果您已经对 AOI 的处理部分感到满意并且不想在搜索结果中看到它(修剪后的部分将不再在后台搜索中使用),那么最后一个可能会很有用。
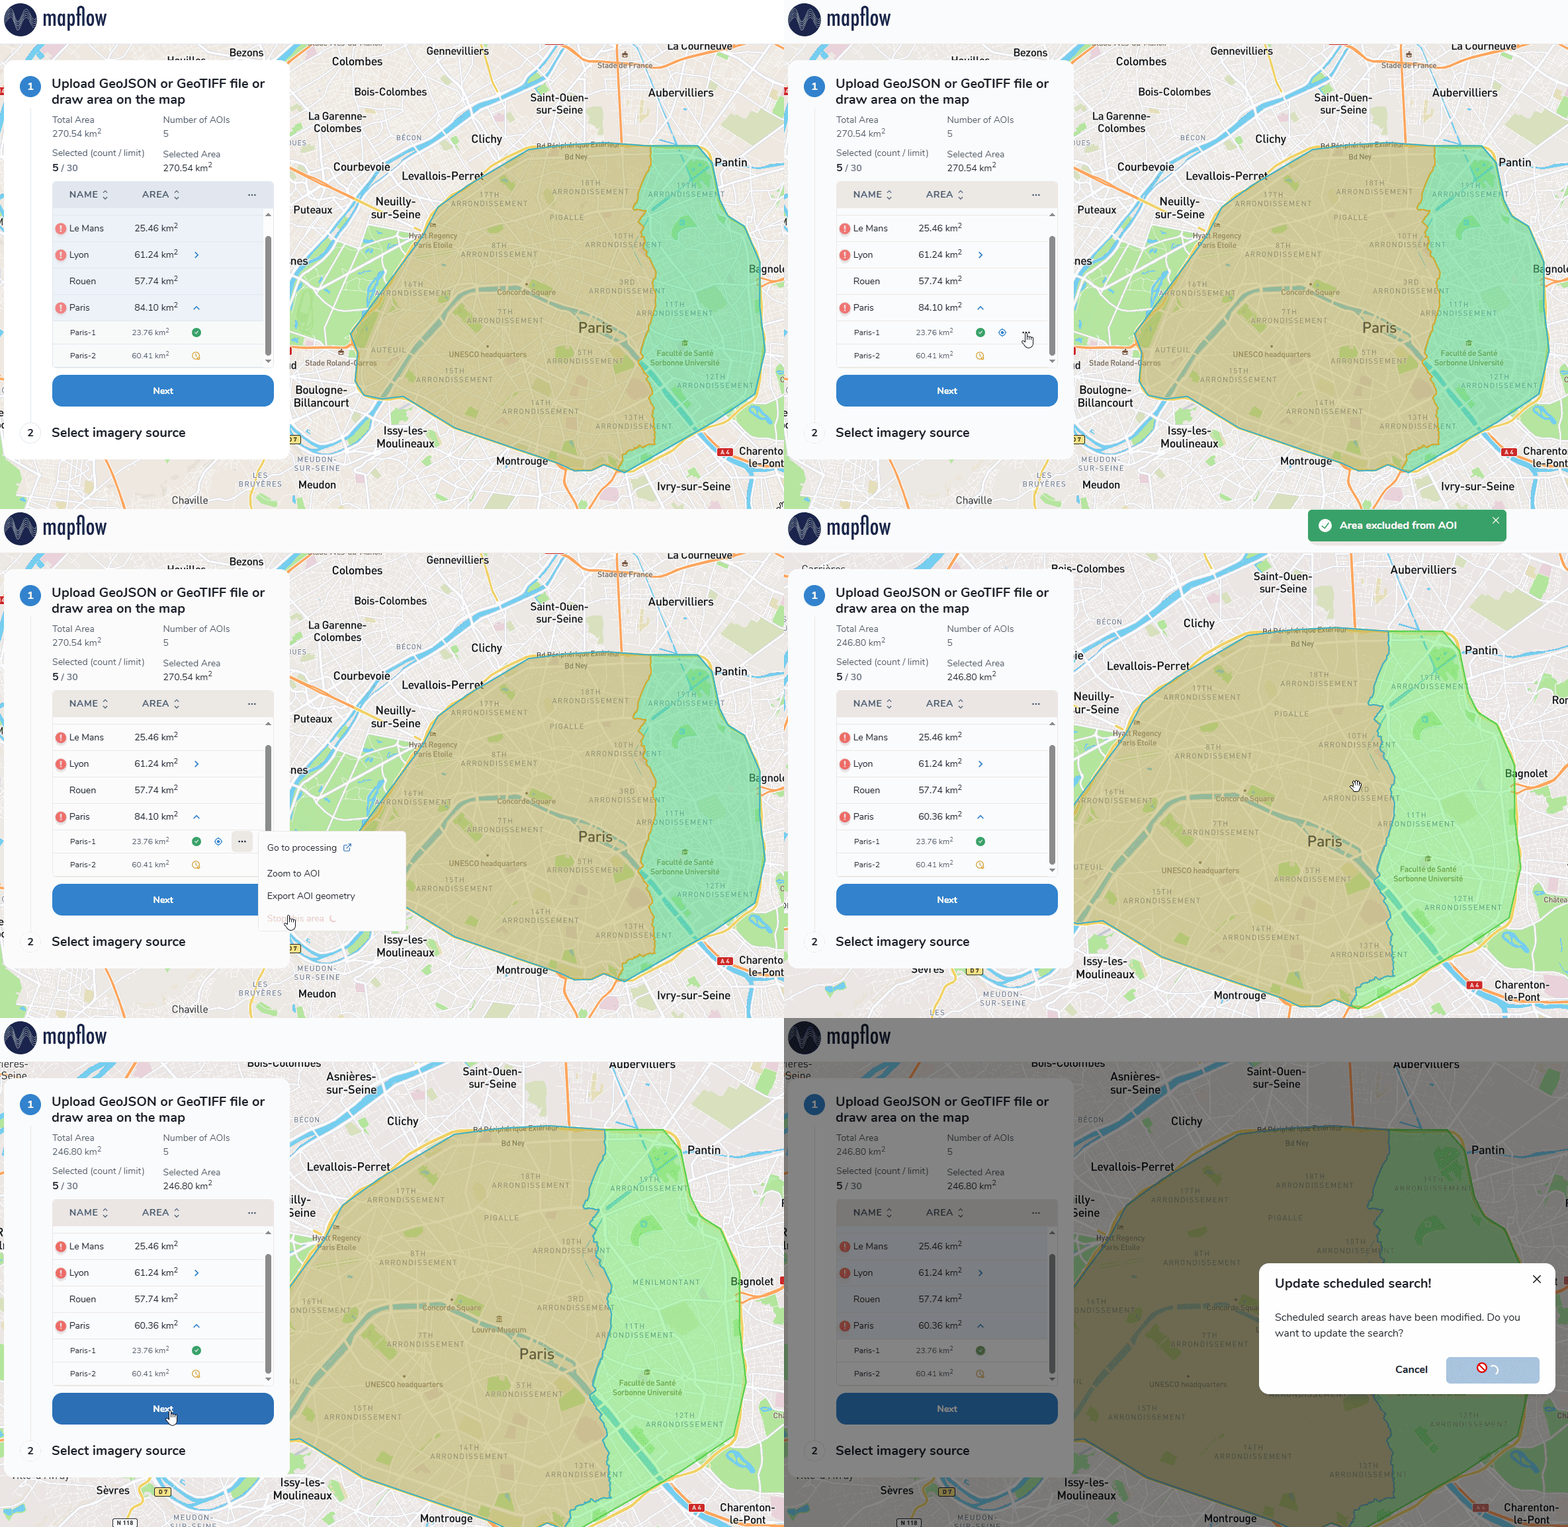
Main operations with Planned Search
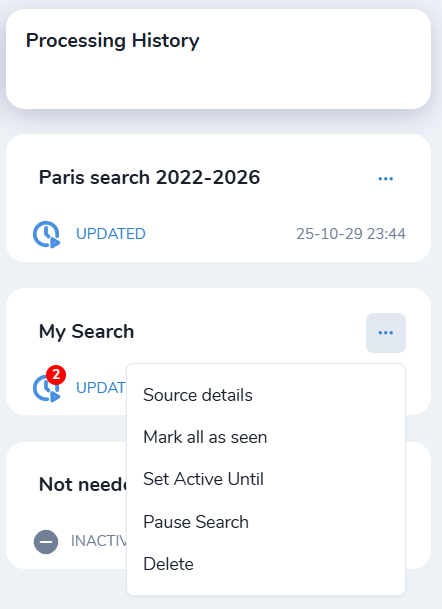
来源详细信息 - 在这里您可以查看和下载搜索的几何形状
全部标记为已查看 - 如果您有大量未读图像,您可以将它们一次性标记为已查看
设置活动直到 - 您可以更改后台搜索的生命周期(创建时默认为 6 个月)
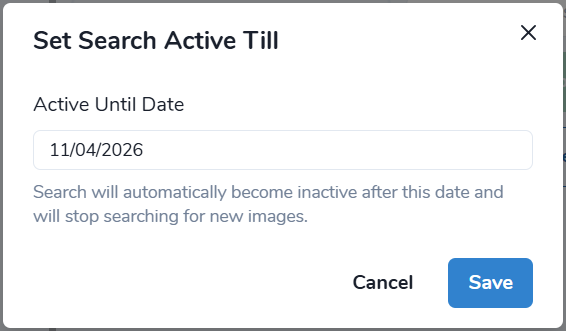
过期后,搜索不会被删除,而是暂停
暂停/恢复搜索 - 暂停意味着它将停止后台搜索,但您仍然可以查看其结果
删除 - 永久删除搜索
修改 AOI 搜索
您可以将新的 AOI 添加到现有搜索、修改几何图形或删除已处理的区域。任何 AOI 更改后,您需要确认这些更改。搜索将更新,结果将相应同步。
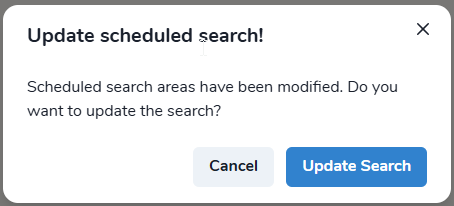
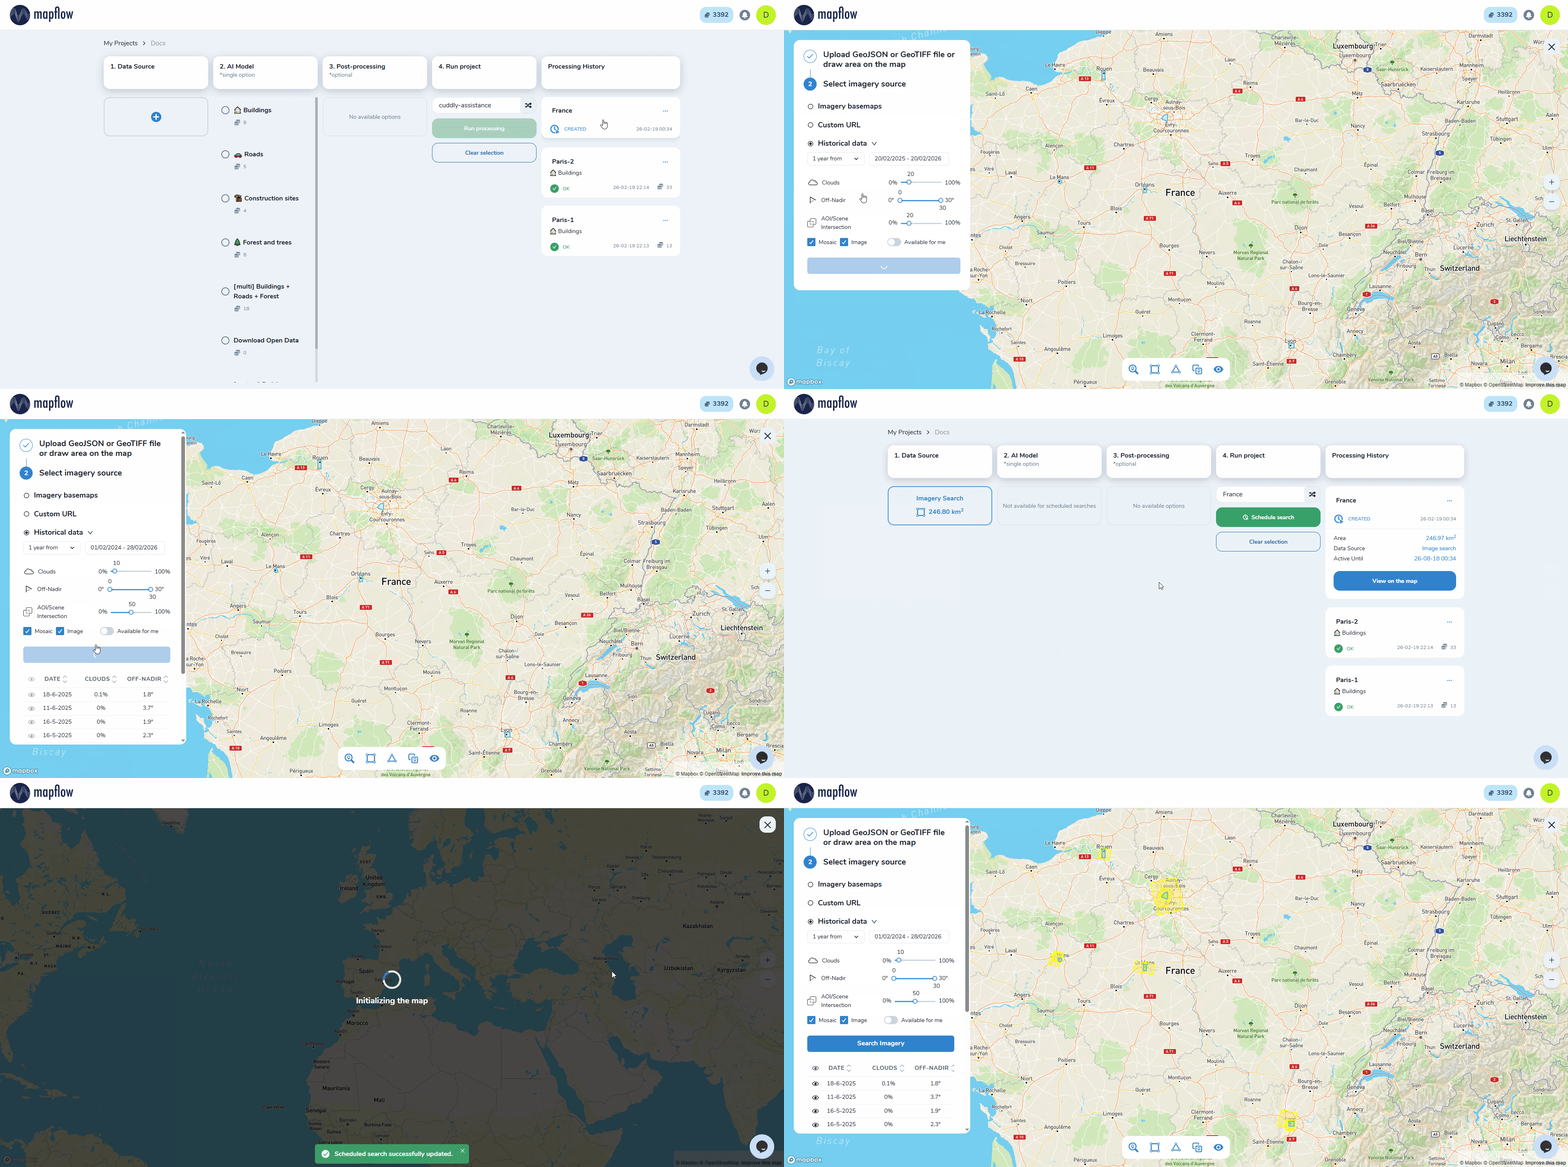
您还可以更改现有搜索的搜索条件:
“在地图上查看”→调整搜索参数→“搜索图像”→“另存为计划”。现在后台搜索将根据新参数进行工作。
在 QGIS 中使用 Mapflow 图像搜索
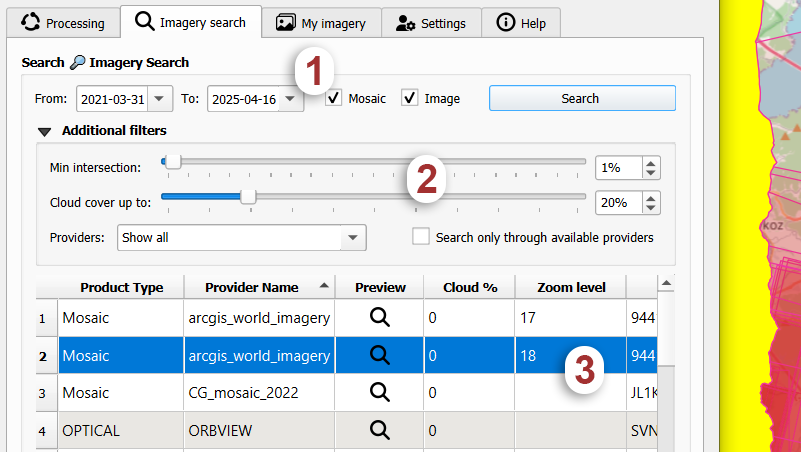
切换到“图像搜索”选项卡。要开始搜索,请设置日期和产品类型过滤器(“马赛克”- 影像底图,如 ArcGIS 或全球马赛克和/或“图像”- 卫星影像档案)
设置额外的过滤器,例如与分析区域的最小交集。
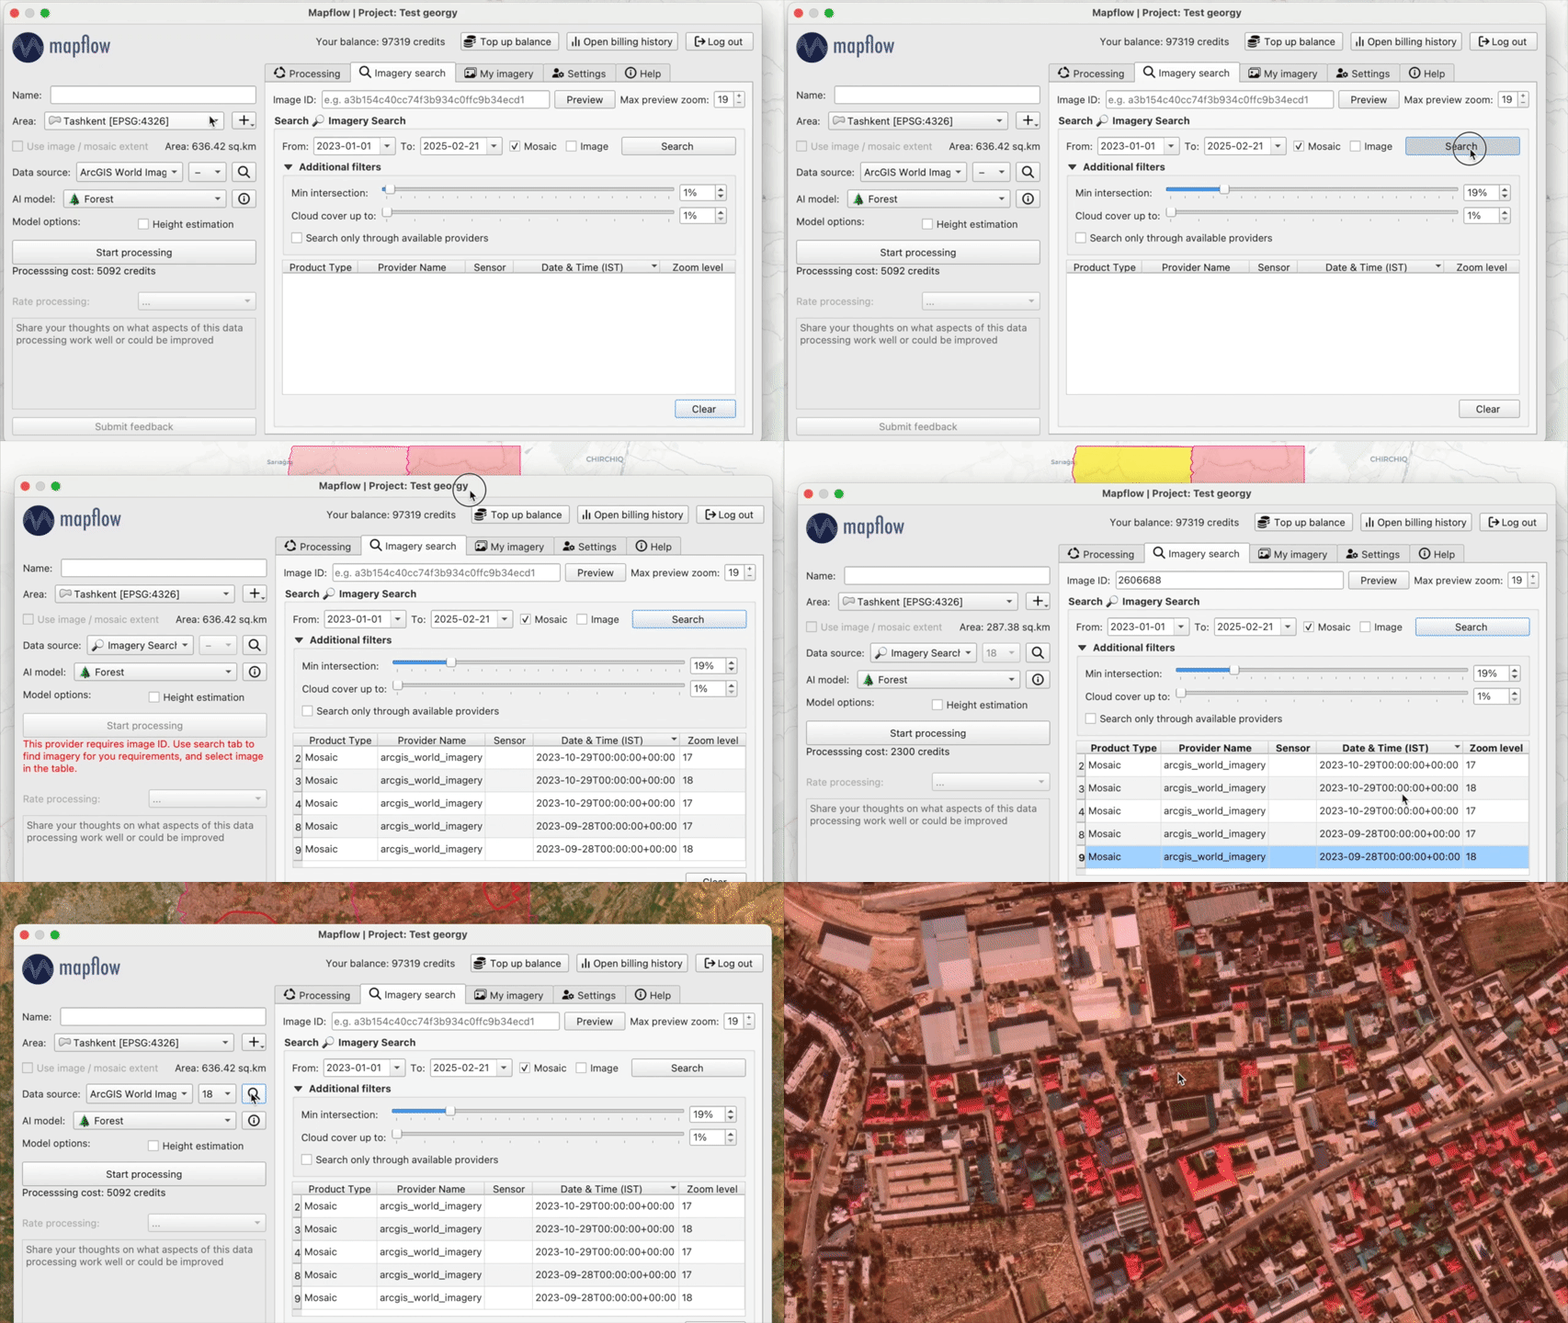
如果有非空响应,它将添加 🔎 Imagery Search 元数据 图层到您的 QGIS 项目。您可以在表中选择一个或多个结果 - 或使用图层的属性表开始使用 Mapflow 模型进行分析和处理。
提示
在 Arcgis 搜索结果中,您可以看到您所在区域的马赛克可用的缩放级别。您可以在“设置”中配置表格列。
参见
👉 有关如何在 Mapflow Web 和 QGIS 插件中使用图像搜索的更多信息,请参阅Mapflow<>QGIS。
QGIS 中的计划搜索
计划搜索是重复的后台搜索。您定义一次搜索区域和参数,Mapflow 会不断在该区域寻找新图像 - 找到新图像时您将收到通知。搜索在后台运行,因此您可以同时继续使用该插件,随时查看结果并直接从中开始处理。
Creating a planned search
切换到 影像搜索 选项卡并设置感兴趣的区域:将其绘制在地图上或选择现有的多边形图层(例如,加载到 QGIS 中的 GeoJSON 文件)。如果图层具有“
name”属性,它将用作 AOI 名称。 AOI 名称也可以稍后分配或更改。设置搜索参数:日期范围、云量、偏离最低点角度、最小交叉点、产品类型和提供商。
在 处理名称 字段中指定搜索名称。
打开 搜索 按钮菜单并选择 计划搜索。
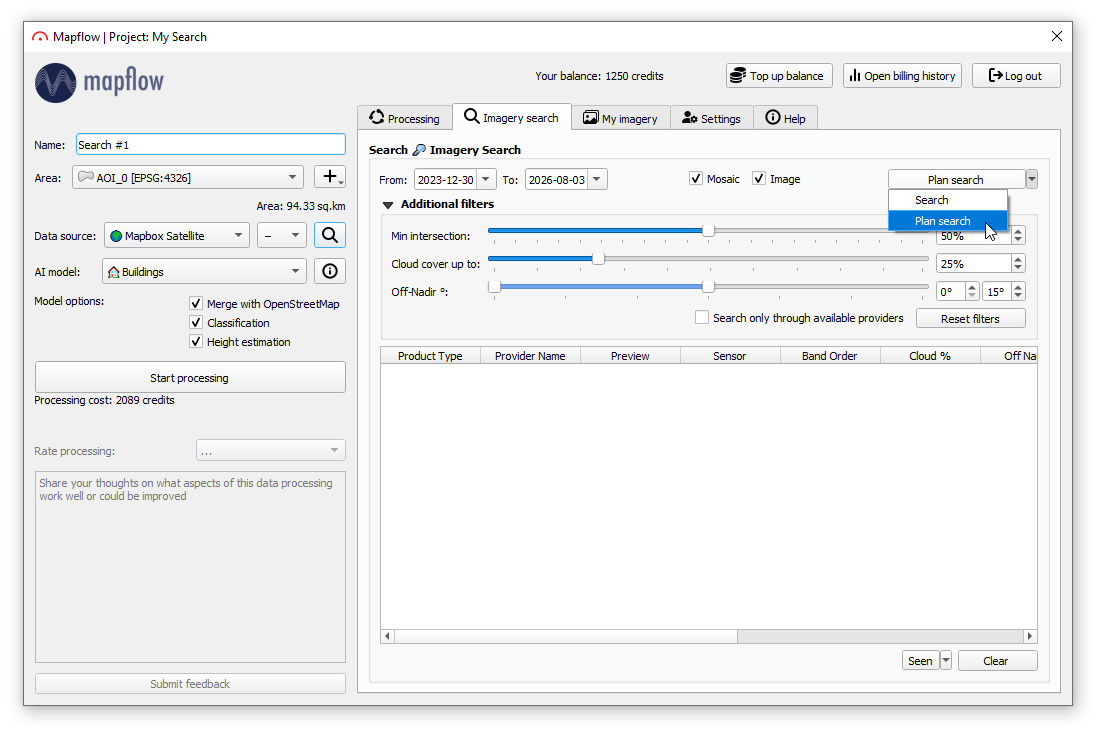
计划的搜索已创建并开始在后台运行。它将继续在选定区域寻找新图像,结果准备就绪后,您将收到通知。
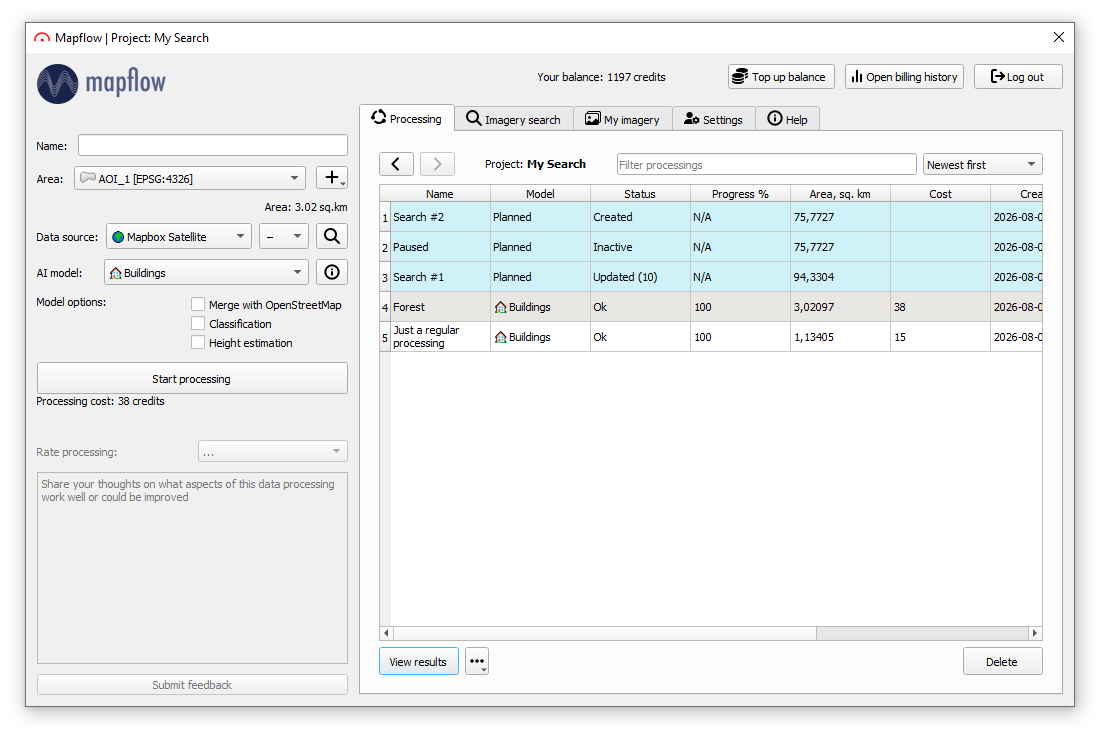
计划的搜索将显示在 处理 表中,工作流程为 “已计划”。它的状态反映了搜索状态:
搜索中 – 初始搜索正在进行中;
创建/更新 – 搜索处于活动状态并正在检查新图像(新图像的数量,例如*更新(3)*,当有任何图像时显示);
非活动 – 搜索已暂停;
失败 – 搜索失败,可以重新启动。
注解
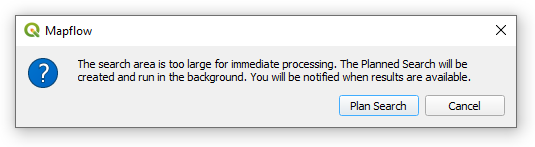
如果感兴趣的区域太大而无法立即搜索,则单击“搜索”将提示您创建计划的搜索 - 搜索区域将需要很长时间才能同步处理。单击 计划搜索 进行确认,计划的搜索将在后台创建并运行。
Opening a planned search
在 Processing 表中选择计划的搜索,然后单击  导航按钮(或双击该行)。该插件进入计划的搜索视图:该表现在显示搜索 AOI,每个 AOI 后面跟着为其启动的处理,以及“无 AOI” 组,用于未链接到任何区域的处理。
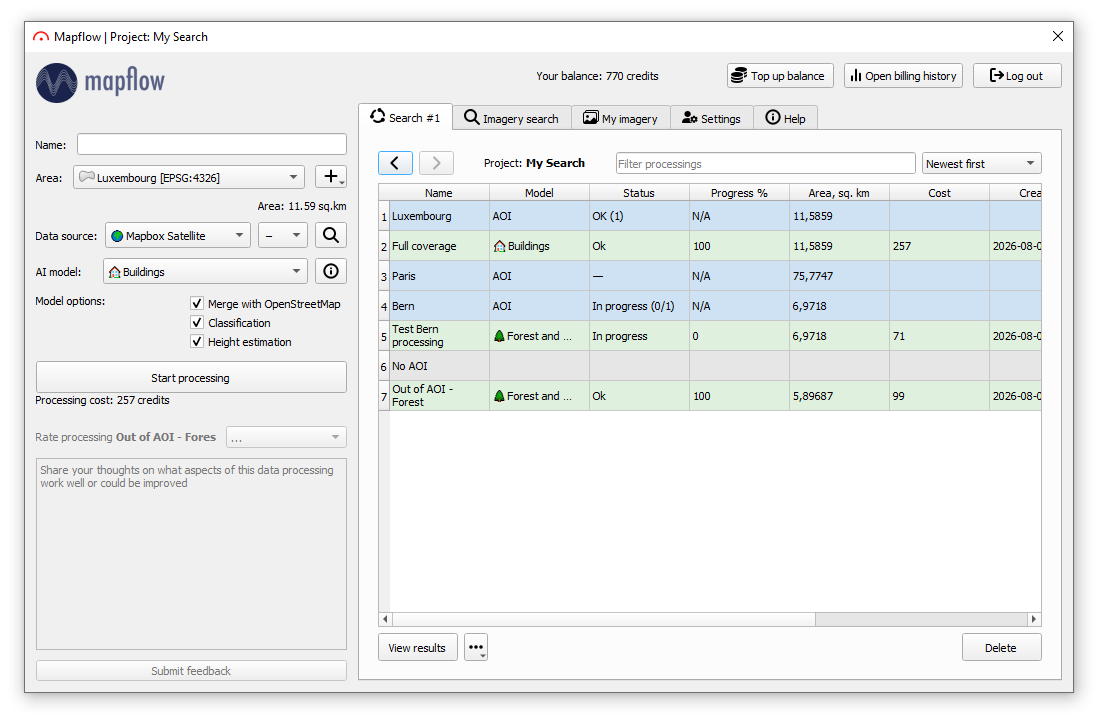
AOI 行显示其处理的聚合状态(OK (n)、In Progress、Failed)。在地图上,计划的搜索显示在“图层”面板中的专用组中 - 每个 AOI 及其处理都分组在一起,并且当您单击它们时,不与任何 AOI 关联的处理会显示在地图上。
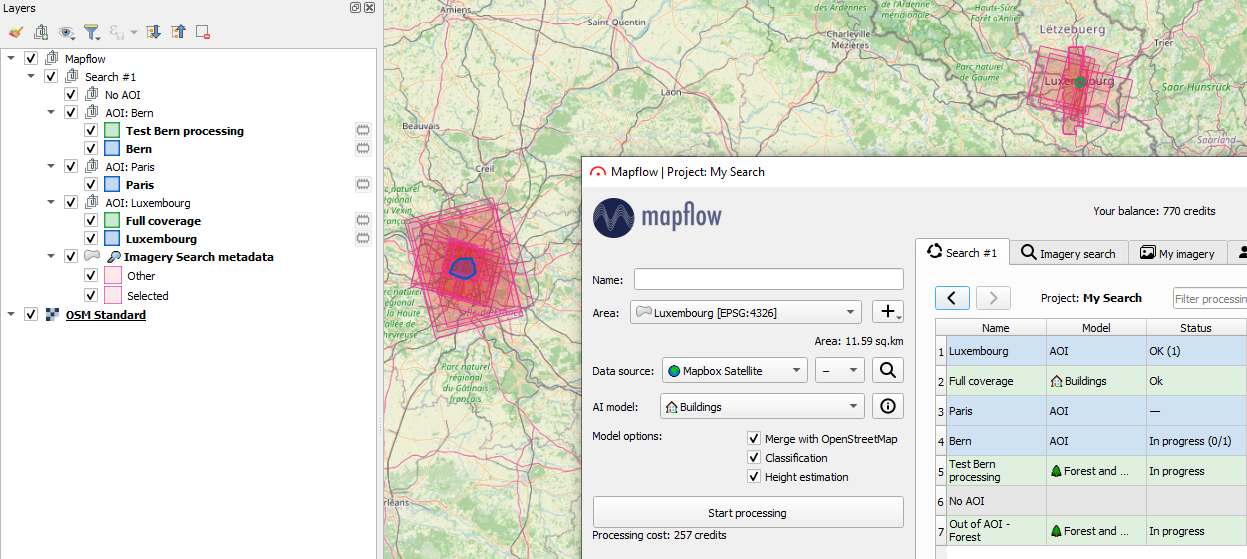
Viewing the search results
打开计划的搜索并切换到图像搜索选项卡。该表显示了为计划搜索的所有 AOI 找到的图像。要仅显示特定区域的结果,请在处理表中选择相应的 AOI 行 - 结果会自动更新。
新图像标有 (!) 符号。您可以使用 已查看 按钮将选定的新图像标记为已查看,或使用 已查看全部 将所有图像标记为已查看 - 标签将会消失。
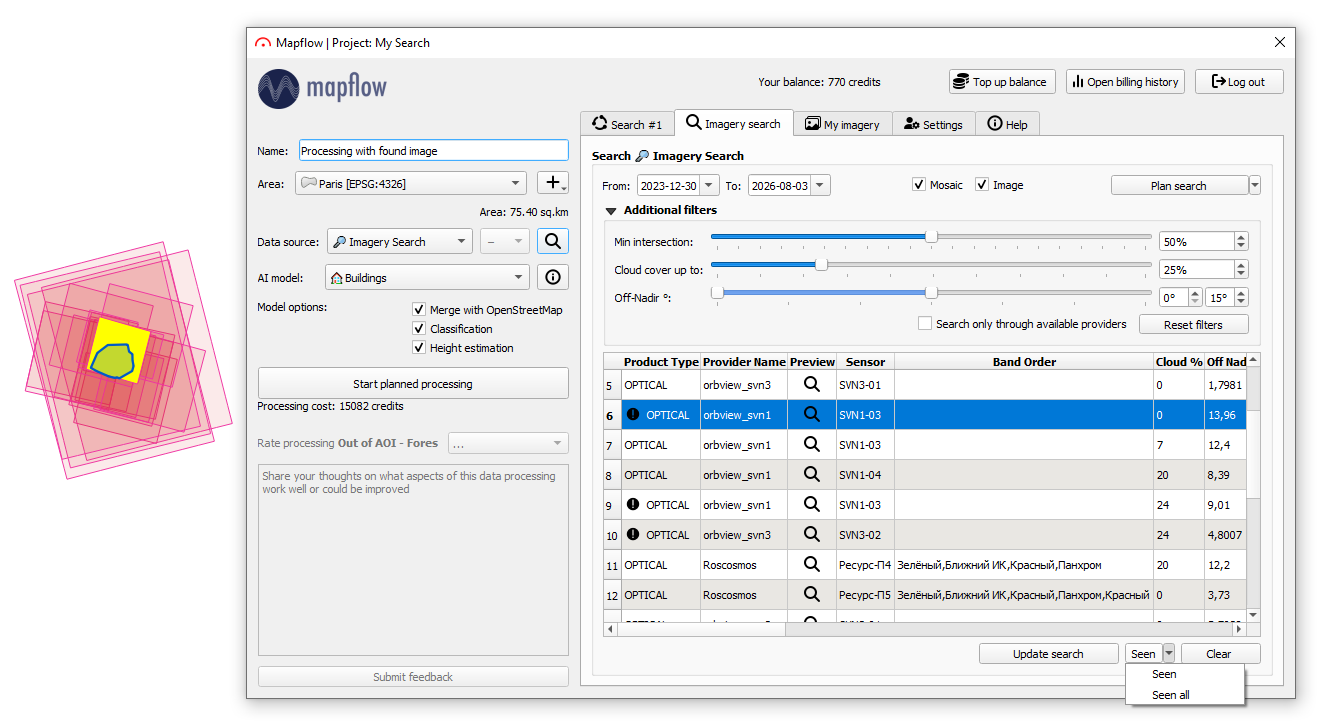
您还可以调整现有计划搜索的搜索条件:更改 影像搜索 选项卡上的过滤器(日期、云量、偏离最低点角度、交叉点、提供商),然后单击 更新搜索 — 新参数将保存到计划搜索,并使用它们重新获取结果。可以通过单击列标题对结果进行排序。
从搜索结果运行处理
在结果表中选择一张或多张图像,然后单击 开始计划处理 - 将从链接到此计划搜索的所选图像启动处理。新处理出现在处理表中,分组在它相交的 AOI 下,并且其足迹显示在地图上。
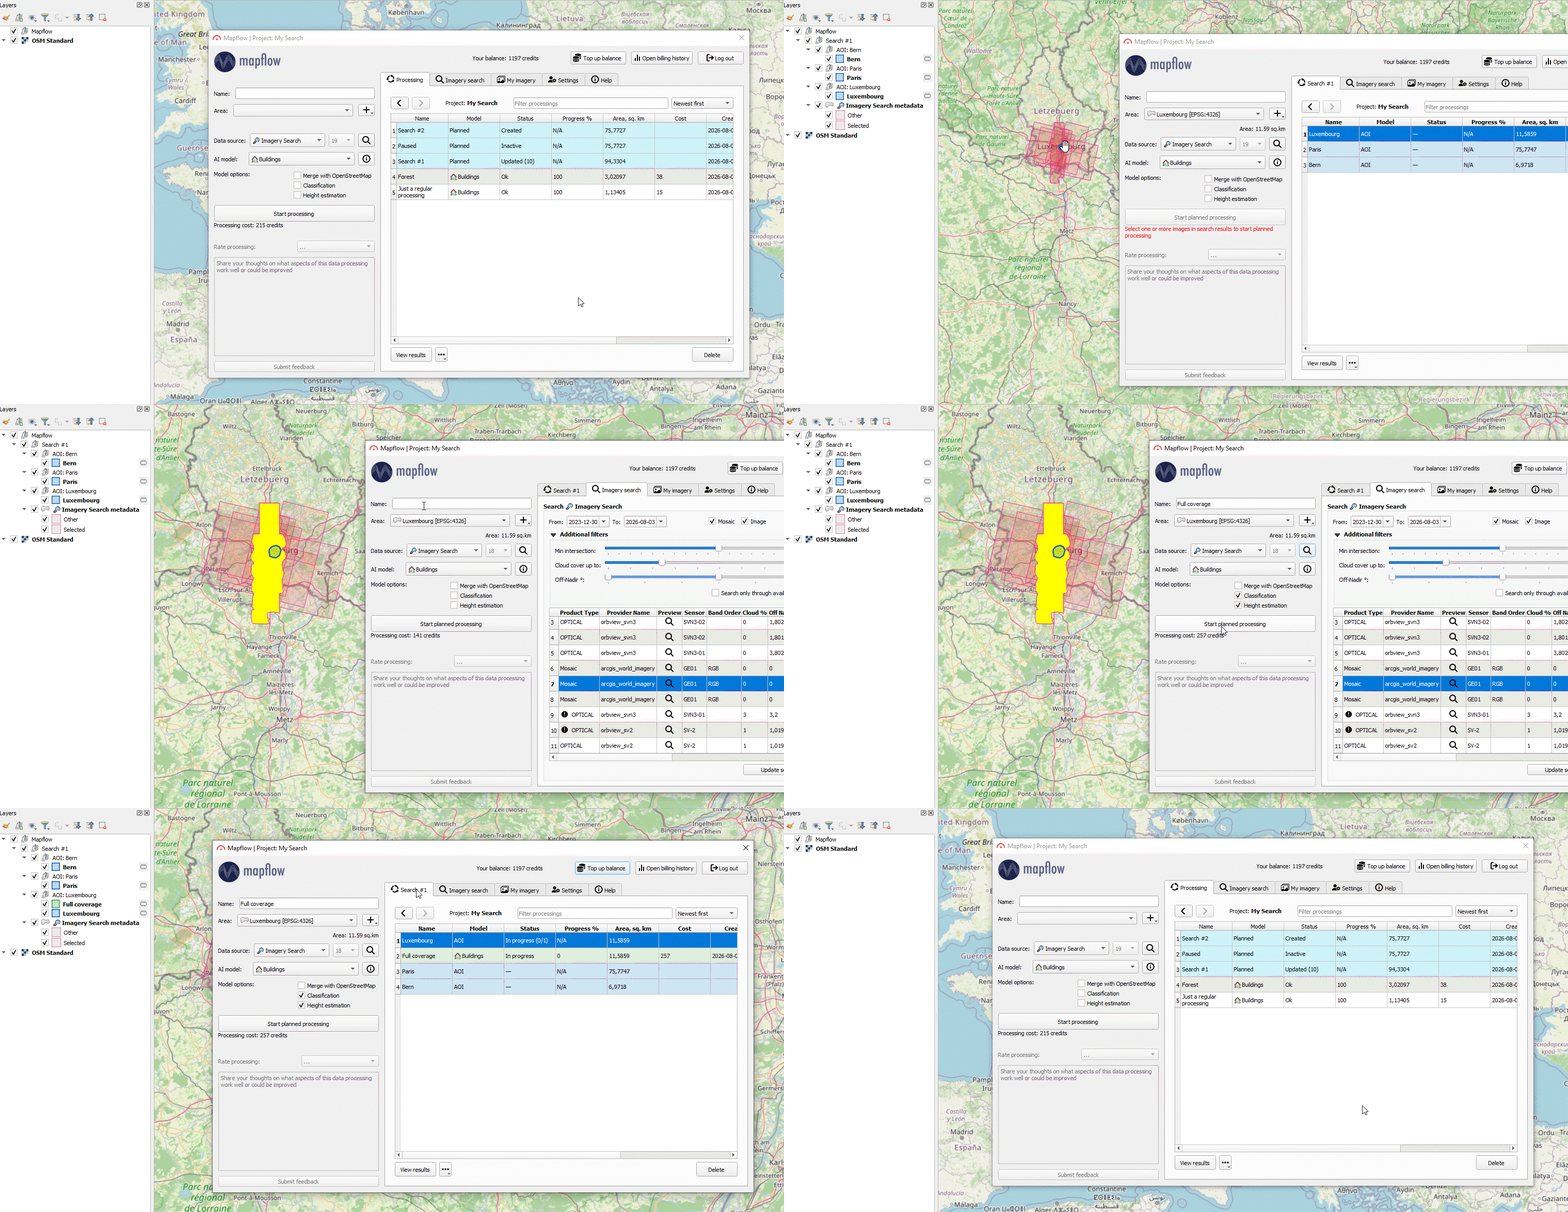
Managing the search AOIs
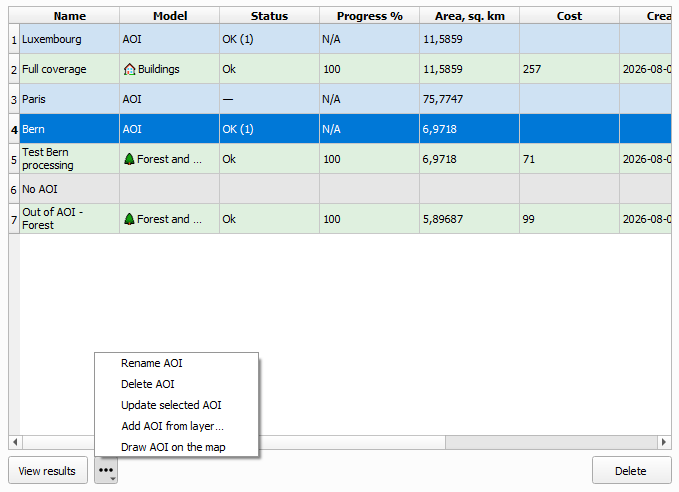
选择 AOI 行并打开选项菜单(查看结果旁边的“...”按钮):
重命名 AOI – 为该区域指定一个新名称;
删除 AOI – 从搜索中删除该区域;
从图层添加 AOI... – 从 QGIS 项目中的多边形图层添加新区域(例如,GeoJSON 文件);
在地图上绘制 AOI – 使用 QGIS 添加功能工具绘制新区域并保存;
更新选定的 AOI – 编辑地图上区域的几何图形(移动顶点,然后单击 保存 AOI);
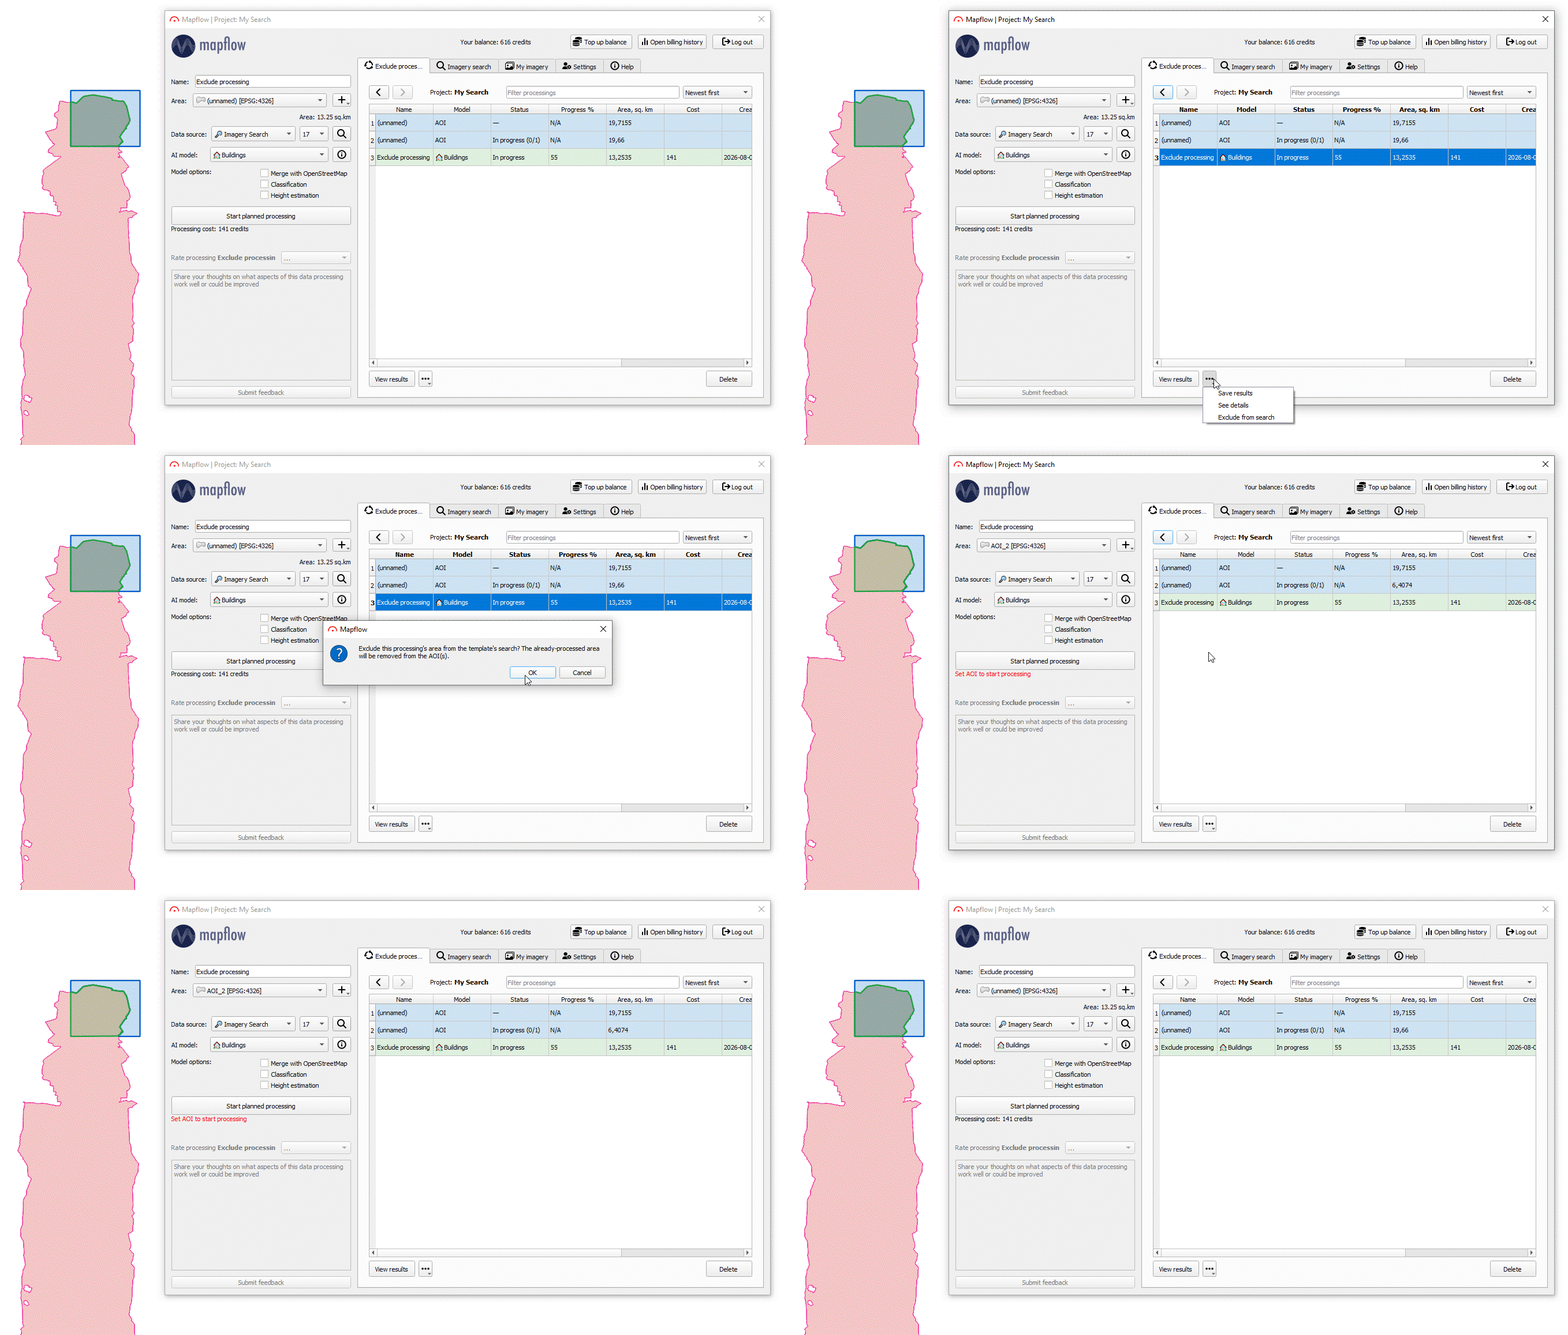
从搜索中排除 – 从搜索 AOI 中删除已处理的区域(在处理行上可用):从它相交的每个 AOI 中减去处理的足迹,因此将不再搜索该区域以查找新图像。
任何 AOI 更改后,搜索都会更新,搜索结果也会相应同步。看看 AOI 管理的实际应用:
注解
从搜索中排除是一种便捷的方法,可以逐渐从已处理的区域中释放搜索,而您不再需要这些区域的搜索结果。
暂停、恢复和重新开始计划的搜索
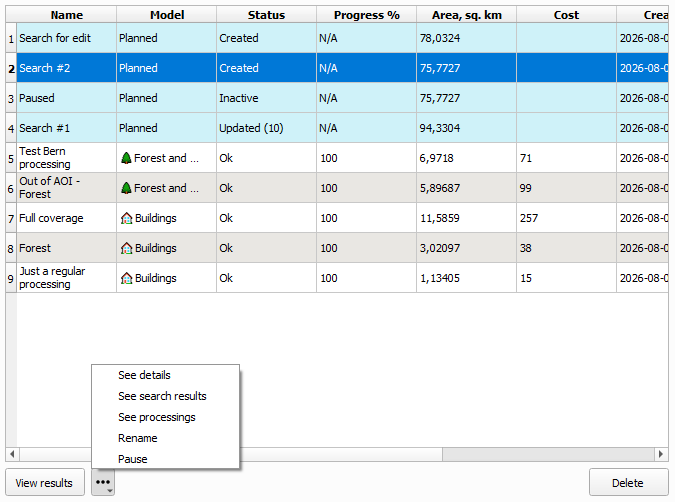
在 处理 表中选择计划的搜索并打开选项菜单:
暂停 – 停止后台搜索:新找到的图像不再更新,但搜索结果仍然可用,您仍然可以从中运行处理;
恢复 – 再次激活暂停的搜索;
重新启动 – 重新运行失败的搜索。
Planned search limits
如果搜索区域太大而无法立即搜索,系统将提示您自动创建计划搜索(见上文)。
在免费计划中,您无法创建大于 1000 km² 的计划搜索。
在免费计划中,您最多可以进行2 个活动计划搜索。如果超过此限制,仍然可以创建新搜索,但它们将以 暂停 状态添加。升级您的计划以恢复它们并创建新的主动搜索。